APIs are the bread and butter of the internet. The ability to interact with our applications programmatically enables interoperability and makes our lives as developers easier. Unfortunately, web applications are vulnerable to malicious actors that seek to misuse them or degrade their performance, which is why rate limiting is an important part of any API. This guide will walk you through using Ruby on Rails to make an API application that manages an animal shelter, and we'll also integrate rate limiting with rack-attack! We'll keep track of cats, dogs, and volunteers through a JSON interface.
You can follow along with the example app we create and even see the source of the final app here on Github. Let's get started!
Installing Ruby
You'll need to install Ruby if you don't already have Ruby installed. In this tutorial, I'll be using Ruby 3.2. If you're starting without a Ruby install, it's wise to use a Ruby version manager like rbenv. You can install rbenv with Homebrew:
brew install rbenv
Next, use rbenv to install Ruby 3.2.0:
rbenv install 3.2.0
Then, set rbenv to use this version of Ruby for your current directory:
rbenv local 3.2.0
Installing Rails
Now that you have Ruby installed, it's time to install Rails. In this tutorial, we'll use Rails 7.1.1. You can install it by running:
gem install rails -v 7.1.1
Generating a new Rails project
Rails is a full-stack framework, but you can omit all the front-end things when generating a project to generate an API. This is useful if you know you only need to serve JSON, like if you'll be integrating with a mobile app, a SPA frontend, or even another service. Generate a new Rails 7.1.1 api with:
rails _7.1.1_ new animal-shelter --api
Then, change into the directory of the new application, in this case, animal-shelter.
For this example, we'll build an application to help an animal shelter operate more efficiently. We'll make API endpoints for cats, dogs, and volunteers. This isn't especially useful on its own, but it lays the groundwork for more business logic later. If you'd like to call your application something different, substitute your name for animal-shelter in the command above.
Using the Rails scaffolds to build out endpoints for tracking cats
First, we'll generate the files to create, read, update, and delete cats. To do this, we'll use Rails' built-in scaffolding, which will generate models, controllers, and even a migration file. Inside your application, run:
rails generate scaffold Cat name:string arrival_date:datetime description:text --api
This creates a model, a controller, several routes, a database migration, and some test files.
Next, run the pending database migration that was just created:
rails db:migrate
Inspecting the cats code
If you go to app/controllers/cats_controller.rb, you'll see that the file has been prepopulated with a number of methods. These methods, without any edits at all, allow us to make HTTP requests to the application to create, read, update, and delete the cat resource. Here's the cats controller:
class CatsController < ApplicationController
  before_action :set_cat, only: %i[ show update destroy ]

  # GET /cats
  def index
    @cats = Cat.all

    render json: @cats
  end

  # GET /cats/1
  def show
    render json: @cat
  end

  # POST /cats
  def create
    @cat = Cat.new(cat_params)

    if @cat.save
      render json: @cat, status: :created, location: @cat
    else
      render json: @cat.errors, status: :unprocessable_entity
    end
  end

  # PATCH/PUT /cats/1
  def update
    if @cat.update(cat_params)
      render json: @cat
    else
      render json: @cat.errors, status: :unprocessable_entity
    end
  end

  # DELETE /cats/1
  def destroy
    @cat.destroy!
  end

  private
    # Use callbacks to share common setup or constraints between actions.
    def set_cat
      @cat = Cat.find(params[:id])
    end

    # Only allow a list of trusted parameters through.
    def cat_params
      params.require(:cat).permit(:name, :arrival_date, :description)
    end
end
Testing out the cats code
You can validate that the code works by using curl or, even easier, an API tool like Postman. Making a POST request to localhost:3000/cats with the following body will let you create a cat in the database:
{
    "name": "Bear",
    "description": "Bear is aloof but loving. She prefers not to be picked up, but in her own time will join happily you for a cuddle.",
    "arrival_date": "2024-01-28 14:11:09.818508"
}
This will create a new row in the cats table of the database and return a 201 created HTTP status with the created object in the response:
{
  "id": 1,
  "name": "Bear",
  "arrival_date": "2024-01-28T14:11:09.818Z",
  "description": "Bear is aloof but loving. She prefers not to be picked up, but in her own time will join happily you for a cuddle.",
  "created_at": "2024-01-28T19:13:51.047Z",
  "updated_at": "2024-01-28T19:13:51.047Z"
}
Manually building endpoints for tracking dogs
Using Rails' generators is incredibly convenient, and you have the opportunity to edit the generated files. Still, it's not great for learning purposes. We'll build a set of endpoints for CRUD operations on a 'dog' resource next, this time without the generators.
Creating a model
First, we'll create the model file. In app/models, create a new file called dog.rb. The file doesn't need a lot, just a class name and the class it should inherit from:
class Dog < ApplicationRecord
end
Inheriting from ApplicationRecord tells Rails that this is a model and provides the class with a set of methods that it will need. Next, we'll create the necessary table in the database to persist records of dogs. We'll first create a new migration by running:
Creating a new database table
rails generate migration CreateDogs
This creates a new timestamped file in the db/migrations directory. In that file, you'll see a change method, which will be executed when the migration is run. The change method already creates a new table with the right name but is missing the rows we want. Change the migration to this:
class CreateDogs < ActiveRecord::Migration[7.1]
  def change
    create_table :dogs do |t|
      t.string :name
      t.datetime :arrival_date
      t.text :description

      t.timestamps
    end
  end
end
Next, run the migration with:
rails db:migrate
Creating routes for the dog resource
Next, we must create routes telling the application where to send incoming web requests. These are defined in config/routes.rb with a DSL that makes this convenient. Inside the code block (before the final end), add this line:
resources :dogs
Writing the DogsController
Finally, we'll write out the DogsController, which will handle CRUD actions for the dog resource. Create a new file in app/controllers/ called dogs_controller.rb There are a few different ways to write the code as long as you contain write the appropriate public methods, but you can speed things up by copying the CatsController and replacing every cat with dog:
class DogsController < ApplicationController
  before_action :set_dog, only: %i[ show update destroy ]

  # GET /dogs
  def index
    @dogs = Dog.all

    render json: @dogs
  end

  # GET /dogs/1
  def show
    render json: @dog
  end

  # POST /dogs
  def create
    @dog = Dog.new(dog_params)

    if @dog.save
      render json: @dog, status: :created, location: @dog
    else
      render json: @dog.errors, status: :unprocessable_entity
    end
  end

  # PATCH/PUT /dogs/1
  def update
    if @dog.update(dog_params)
      render json: @dog
    else
      render json: @dog.errors, status: :unprocessable_entity
    end
  end

  # DELETE /dogs/1
  def destroy
    @dog.destroy!
  end

  private
  # Use callbacks to share common setup or constraints between actions.
  def set_dog
    @dog = Dog.find(params[:id])
  end

  # Only allow a list of trusted parameters through.
  def dog_params
    params.require(:dog).permit(:name, :arrival_date, :description)
  end
end
Testing the DogsController
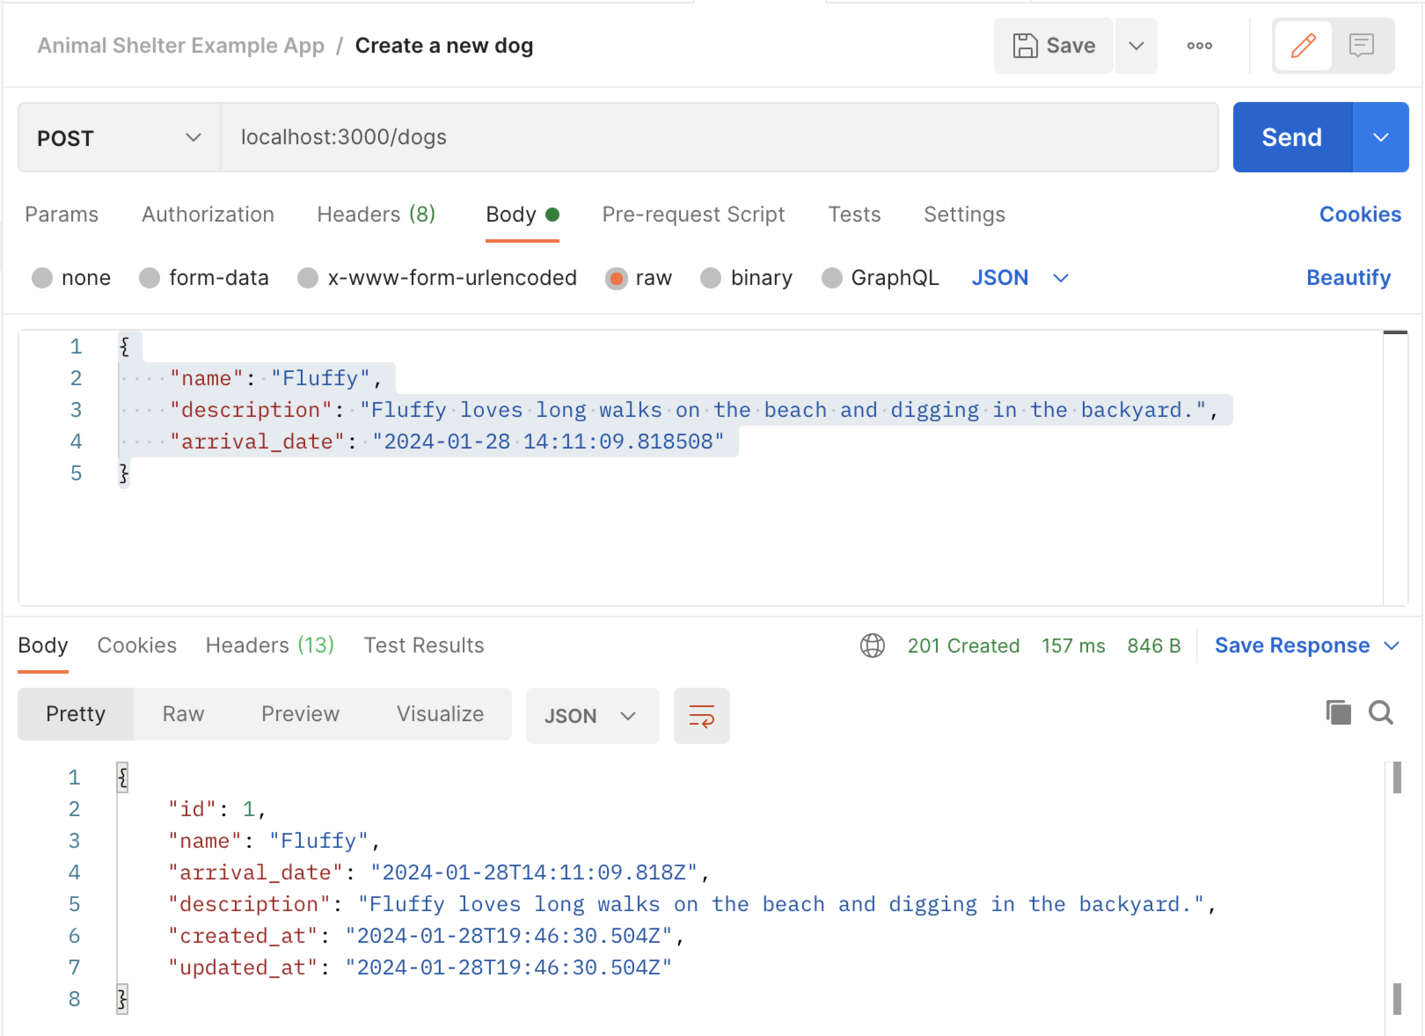
Finally, you can create, read, update, and delete dogs via the API just like you can for cats! Restart your rails server with rails s, then you can use Postman to create a new dog like this:
 A screenshot of creating a dog with the API via Postman
Using scaffolds to build endpoints for tracking volunteers
Lastly, we'll use the scaffold again to create endpoints for tracking volunteers. To start, run:
rails generate scaffold Volunteer name:string cumulative_hours:integer --api
Next, run the newly generated migration with:
rails db:migrate
This gives us everything we need for volunteers!
Integrating rack-attack for rate limiting
Now that we have a working Rails API with three different resources, we have a functional application for which we can add rate limiting! Rate limiting helps protect your application against malicious actors. Put simply, it throttles the amount of requests that someone can make to the API in a given time period. This adds a layer of protection to mitigate scraping, DoS, DDoS, and brute force attacks.
We can use a popular Ruby Gem called rack-attack to add rate limiting to this API. First, add the gem to the Gemfile:
gem 'rack-attack'
Next, install it with:
bundle install
Next, we'll configure rack-attack. Create a new file in config/initializers called rack-attack.rb.
In that configuration, we'll add the setup from rack's documentation. We'll strip out all of the configuration except that which throttles requests by IP. Your config should look like this:
class Rack::Attack

  ### Configure Cache ###

  # If you don't want to use Rails.cache (Rack::Attack's default), then
  # configure it here.
  #
  # Note: The store is only used for throttling (not blocklisting and
  # safelisting). It must implement .increment and .write like
  # ActiveSupport::Cache::Store

  # Rack::Attack.cache.store = ActiveSupport::Cache::MemoryStore.new

  ### Throttle Spammy Clients ###

  # If any single client IP is making tons of requests, then they're
  # probably malicious or a poorly-configured scraper. Either way, they
  # don't deserve to hog all of the app server's CPU. Cut them off!
  #
  # Note: If you're serving assets through rack, those requests may be
  # counted by rack-attack, and this throttle may be activated too
  # quickly. If so, enable the condition to exclude them from tracking.

  # Throttle all requests by IP (60rpm)
  #
  # Key: "rack::attack:#{Time.now.to_i/:period}:req/ip:#{req.ip}"
  throttle('req/ip', limit: 300, period: 5.minutes) do |req|
    req.ip # unless req.path.start_with?('/assets')
  end


  ### Custom Throttle Response ###

  # By default, Rack::Attack returns an HTTP 429 for throttled responses,
  # which is just fine.
  #
  # If you want to return 503 so the attacker might be fooled into
  # believing that they've successfully broken your app (or you just want to
  # customize the response), then uncomment these lines.
  # self.throttled_responder = lambda do |env|
  #  [ 503,  # status
  #    {},   # headers
  #    ['']] # body
  # end
end
This contains helpful comments and sets a throttle for the entire application. If the application receives more than 300 requests in a 5-minute period, it will return a 429.
Testing our rate limiting
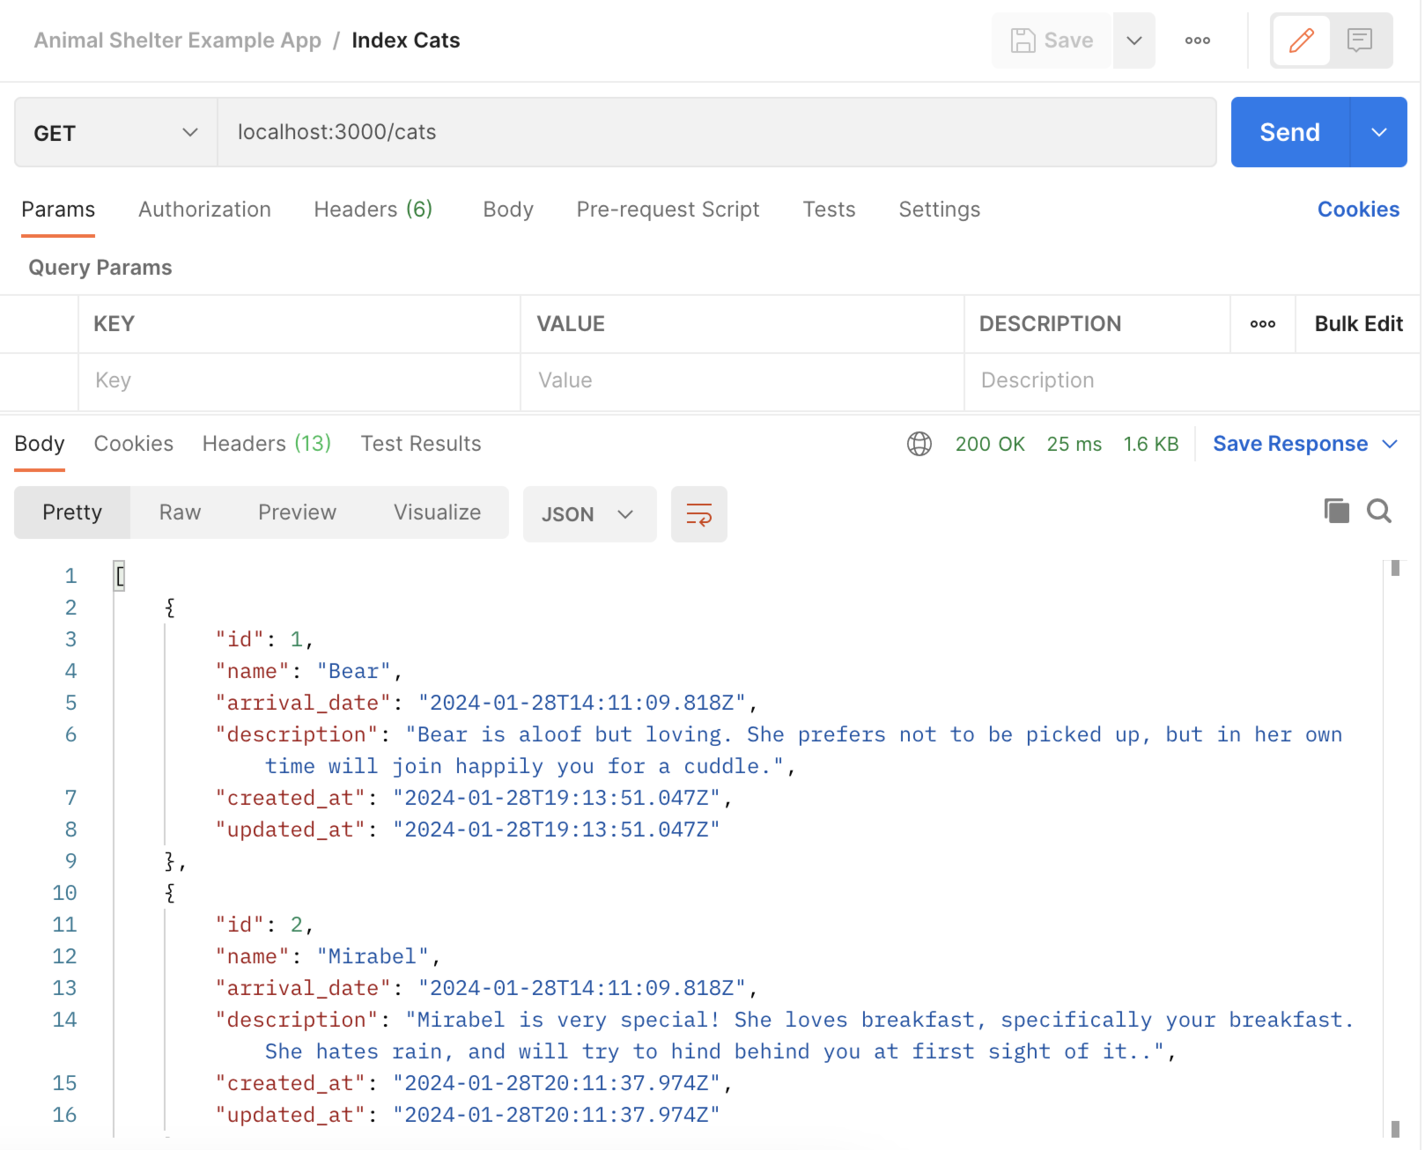
We can test our rate limiting in a number of ways, so let's first create a few more cats in the database with a few POST /cats to our application. Once we've done that, we can GET /cats and see an array of existing cats in our database.
 A screenshot of Postman getting an index of all cats
Next, we can temporarily change our configuration in rack-attack.rb to allow even fewer requests per 5-minute period.
# Throttle all requests by IP (60rpm)
#
# Key: "rack::attack:#{Time.now.to_i/:period}:req/ip:#{req.ip}"
throttle('req/ip', limit: 5, period: 5.minutes) do |req|
  req.ip # unless req.path.start_with?('/assets')
end
Also, we'll need to add in a chunk of code that configures rack-attack to use the MemoryStore cache if Redis is not present. Without this, rack-attack will not work in development, as the default cache in development is :null_store. In rack-attack.rb, add:
if !ENV['REDIS_URL'] || Rails.env.test?
  cache.store = ActiveSupport::Cache::MemoryStore.new
end
Without the placeholder comments, rack-attack.rb now looks like:
class Rack::Attack
  if !ENV['REDIS_URL'] || Rails.env.test?
    cache.store = ActiveSupport::Cache::MemoryStore.new
  end

  # Throttle all requests by IP (60rpm)
  # Key: "rack::attack:#{Time.now.to_i/:period}:req/ip:#{req.ip}"
  throttle('req/ip', limit: 5, period: 5.minutes) do |req|
    req.ip # unless req.path.start_with?('/assets')
  end
end
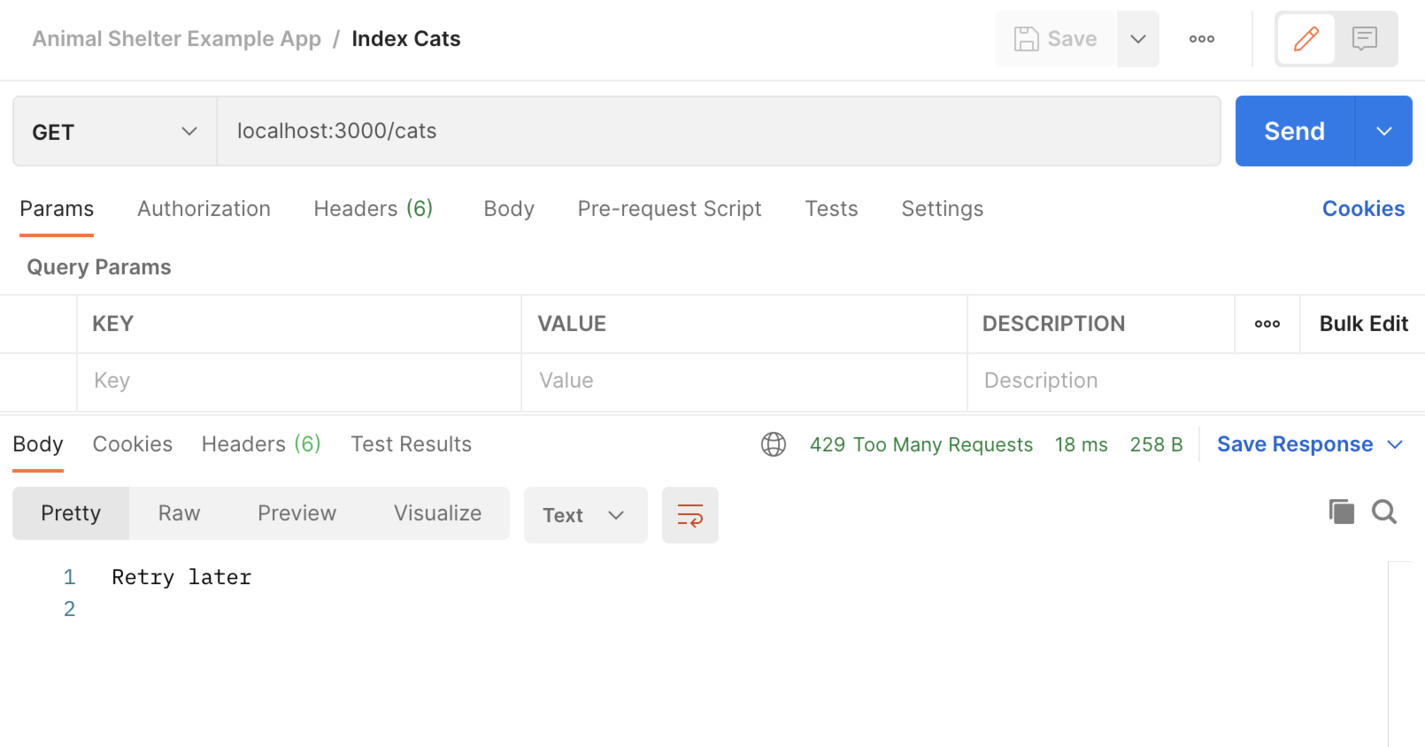
Lastly, you can use Postman to make six subsequent requests to the application on any endpoint. Six requests to GET /cats now returns a 429!
 A screenshot of Postman getting rate limited
This application-wide rate limiting is a great catch-all, but rack-attack allows you to do much more! You can limit specific endpoints, limit the total number of requests (disregarding source IP), blocklist, safelist, and more!
Conclusion
This tutorial has provided a comprehensive guide to building a Ruby on Rails API application with rate limiting to protect it! We've explored using the scaffold to quickly generate endpoints and also creating them manually. Rate limiting using rack-attack is a very helpful feature, safeguarding our application against abuse. With these tools and techniques at your disposal, you're now equipped to create robust and efficient Rails API applications tailored to your specific needs. I encourage you to explore the rack-attack documentation to learn more about rate limiting at a more granular level than we explored.


