There are several ways to add multi-factor authentication (MFA) for safer user authentication. Let’s look at how to add a modern MFA approach to a Rails application with WebAuthn.
What is multi-factor authentication?
Multi-factor authentication is an authentication method that adds more pieces of evidence (factors) to an authentication mechanism and makes it more secure:
- Knowledge: something only the user knows, for example:
- Password (you know, the most common way)
- PIN (e.g., for credit card)
- Possession: something specific that the user must have, for example:
- SIM card for SMS based one-time passwords (OTPs)
- Mobile phone with an application for OTP generation
- Hardware security keys (tokens)
- Inherence: something only the user is, for example:
- Retina or iris scan
- Fingerprint scan (e.g., Apple Touch ID)
- Facial recognition (e.g., Apple Face ID)
- Hand geometry
The most common MFA methods utilize OTPs via SMS (which are not as secure as they seem to be) or an authenticator application, such as the Google Authenticator app, or a modern password manager (such as Bitwarden or 1Password).
With WebAuthn, you can allow (or enforce) the use of more factors for authentication than the password or an OTP. Users who do not utilize a password manager could use their favorite password, even if it has been leaked (see haveibeenpwned.com), because adding another factor with WebAuthn should prevent any unauthorized access to their account (but I do not recommend it, of course).
As many of today's devices have built-in authenticators (such as Touch/Face ID on Apple devices, other alternatives on Android devices, and Windows Hello on devices with MS Windows), it is easier than ever for people to use them as another factor for authentication with WebAuthn.
What is WebAuthn?
WebAuthn (Web Authentication) is a specification written by the W3C, FIDO, and others, including Google, Microsoft, Yubico, Apple, and PayPal. WebAuthn’s API allows the use of an authenticator, a security hardware key (from, for example, Yubico, or GoTrust), Windows Hello, or even Apple Touch/Face ID, to authenticate a user within a browser and can act as MFA.
WebAuthn API is well supported in all major browsers and platforms.
 Support for FIDO2: WebAuthn and CTAP. Image source fidoalliance.org.
In this article, I will demonstrate how to implement WebAuthn with Devise, a popular authentication library for Rails. All the mentioned options (security keys, Windows Hello, and Apple Touch/Face ID) will be available to use within the application.
For more information about WebAuthn, you can look at webauthn.io.
How does WebAuthn work?
There are a lot of sources you can look at to see how it works (e.g., here and here). I will try to simplify it to the bare basics for the purpose of our implementation. The good news is that WebAuthn is based on public-key cryptography.
The following parts are involved during WebAuthn:
- Authenticator: a security key, Touch ID, Windows Hello, etc.
- Client: the user and his or her web browser.
- Relying Party: the Rails app in our case.
In these processes:
- Registration: this process creates a new set of public-key credentials by the authenticator, which will be used for authentication. The public part is sent back to the relying party for the authentication process.
- Authentication: the relying party sends a challenge to the authenticator, which signs it with the registered public-key credentials and sends it back. The relying party can verify it using the stored public part of the authenticator’s credentials (from registration).
During both processes, the user needs to verify that he or she has access to the authenticator by, for example, touching the security key or Touch ID or using Windows Hello.
Base information about the Rails app
I created a GitHub repository with all of the code used in this article. The application uses Rails 6.1 with Turbo and Stimulus. When I use Turbo, I will also inform you of an option that can be used when Turbo is not available in your application.
For some styling and icons, I used Tailwind CSS 2 and Font Awesome 5 in a free version.
The main difference in this application compared to Rails defaults is the use of Vite instead of Webpacker. Vite is just a modern alternative to Webpack. If you are already using Webpacker, you only need to change the path for the Stimulus controllers (probably app/javascript/controllers instead of app/frontend/controllers/, which is used with Vite).
This article starts at the point where all of the above is prepared, and the Devise gem is already installed and configured (see the main branch, where you can see all the related commits to this setup).
Authenticator registration
Before we can use WebAuthn for 2FA or passwordless login, we will need to register some authenticators in our app.
Installing WebAuthn
Luckily, there is a WebAuthn gem for Ruby (thanks!) that will do all the hard work for us. Just run bundle add webauthn.
Next, we will copy the configuration into config/initializers/webauthn.rb from the gem and change config.origin and config.rp_name. I also uncomment config.credential_options_timeout. Below, you can see it without comments, but I suggest leaving them in place.
WebAuthn.configure do |config|
  config.origin = ENV.fetch("APP_URL", "http://localhost:3000")
  config.rp_name = "WebAuthn with Devise"
  config.credential_options_timeout = 120_000
end
Storing credentials in the application
For WebAuthn, we will need to store webauthn_id for each user and credentials for each of his or her authenticators.
We will start with credentials:
rails g model webauthn_credential user:references external_id:string:uniq public_key:string nickname:string sign_count:integer
I recommend adding null: false and one more index to the migration for the uniqueness of the nickname per user:
class CreateWebauthnCredentials < ActiveRecord::Migration[6.1]
  def change
    create_table :webauthn_credentials, id: :uuid do |t|
      t.references :user, null: false, foreign_key: true, type: :uuid
      t.string :external_id, null: false
      t.string :public_key, null: false
      t.string :nickname, null: false
      t.integer :sign_count, null: false, default: 0

      t.timestamps
    end
    add_index :webauthn_credentials, :external_id, unique: true
    add_index :webauthn_credentials, %i[nickname user_id], unique: true
  end
end
Don’t forget to add corresponding validations to the model.
# app/models/webauthn_credential.rb

class WebauthnCredential < ApplicationRecord
  belongs_to :user

  validates :external_id, presence: true, uniqueness: true
  validates :public_key, presence: true
  validates :nickname, presence: true, uniqueness: {scope: :user_id}
  validates :sign_count, presence: true, numericality: {only_integer: true, greater_than_or_equal_to: 0}
end
The last part of this is adding webauthn_id to users.
rails g migration add_webauthn_id_to_users webauthn_id:string:uniq
With the update of app/models/user.rb with the validation and association.
has_many :webauthn_credentials, dependent: :destroy

validates :webauthn_id, uniqueness: true
After rails db:migrate, we can continue with a controller for managing authenticators.
Controller
We will need to display a form and a list of added authenticators (index action), as well as be able to remove each of them (destroy action) and create a new one (create action).
As for the index action, it will be very simple. Just get existing credentials for the current user and display them in the index view.
# app/controllers/webauthn/credentials_controller.rb

def index
  credentials = current_user.webauthn_credentials.order(created_at: :desc)

  render :index, locals: {
    credentials: credentials
  }
end
Below is a Rails view where we render the form and a list of already added credentials.
<!-- app/views/webauthn/credentials/index.html.erb -->

<% content_for(:title, 'WebAuthn') %>

<div id="new_webauthn_credential" class="w-full">
  <%= render partial: "form", locals: {credential: WebauthnCredential.new} %>
</div>

<div class="flow-root mt-6">
  <ul id="webauthn_credentials" class="divide-y divide-gray-200">
    <%= render partial: "credential", collection: credentials %>
  </ul>
</div>

<ul class="block mt-6">
  <li><%= link_to "Back to dashboard", root_path, class: 'text-sm font-medium text-gray-600 hover:text-gray-500' %></li>
</ul>
The credential partial will display only the nickname and destroy button.
<!-- app/views/webauthn/credentials/_credential.html.erb -->

<li id="<%= dom_id(credential) %>" class="py-4">
  <div class="flex items-center space-x-4">
    <div class="flex-1 min-w-0">
      <p class="text-sm font-medium text-gray-900 truncate">
        <%= credential.nickname %>
      </p>
    </div>
    <div>
      <%= button_to webauthn_credential_path(credential), method: :delete, class: "inline-flex items-center px-2.5 py-0.5 text-sm leading-5 font-medium text-red-700 bg-white hover:text-red-500" do %>
        <i class="fas fa-trash"></i>
      <% end %>
    </div>
  </div>
</li>
Here, you can see the dom_id needed for the destroy action below (for the turbo_stream.remove).
# app/controllers/webauthn/credentials_controller.rb

def destroy
  credential = current_user.webauthn_credentials.find(params[:id])
  credential.destroy

  render turbo_stream: turbo_stream.remove(credential)
end
If you are not using Turbo in your app, you can use Rails UJS (
link_towithmethod: :delete) andredirect_to webauthn_credentials_urlin the controller.
Let’s look at the form. It will contain only a text field for the nickname and a submit button.
<!-- app/views/webauthn/credentials/_form.html.erb -->

<%= form_with(model: credential, method: :post) do |f| %>
  <div class="flex mb-5 flex-row">
    <%= f.text_field :nickname, placeholder: "How it will be called?", class: "form-input block w-full rounded-md border-gray-300 shadow-sm focus:border-indigo-300 focus:ring focus:ring-indigo-200 focus:ring-opacity-50", required: true %>
    <%= f.button :button, class: "flex-grow-0 ml-1 w-11 px-3 py-2 border border-transparent text-lg leading-4 font-medium rounded-md text-white bg-green-600 hover:bg-green-500 focus:outline-none focus:border-green-700 focus:shadow-outline-indigo active:bg-green-700 transition ease-in-out duration-150" do %>
      <i class="fas fa-plus"></i>
    <% end %>
  </div>
  <%= turbo_frame_tag "webauthn_credential_error" %>
<% end %>
Challenge
As noted in the beginning, the registration also has a challenge, which is needed for the registration to be validated on the backend. We will point the form to the newly created controller, which will provide the challenge.
This controller will create a challenge for the authenticator and save it into the session, so we will be able to use it when the browser sends it back signed.
# app/controllers/webauthn/credentials/challenges_controller.rb

class Webauthn::Credentials::ChallengesController < ApplicationController
  def create
    # Generate WebAuthn ID if the user does not have any yet
    current_user.update(webauthn_id: WebAuthn.generate_user_id) unless current_user.webauthn_id

    # Prepare the needed data for a challenge
    create_options = WebAuthn::Credential.options_for_create(
      user: {
        id: current_user.webauthn_id,
        display_name: current_user.email, # we have only the email
        name: current_user.email # we have only the email
      },
      exclude: current_user.webauthn_credentials.pluck(:external_id)
    )

    # Generate the challenge and save it into the session
    session[:webauthn_credential_register_challenge] = create_options.challenge

    respond_to do |format|
      format.json { render json: create_options }
    end
  end
end
Let’s update the form to use this new controller. When submitted, it will send a JSON request for the challenge.
<!-- app/views/webauthn/credentials/_form.html.erb -->

<%= form_with(model: credential, url: webauthn_credentials_challenge_path(format: :json), method: :post, data: {remote: true, turbo: false} do |f| %>
With all needed from the backend, we need to use the WebAuthn API in the browser to communicate with the authenticator. For that, we can use a new Stimulus controller.
First, we will add the necessary NPM packages. We will use @github/webauthn-json as a nice wrapper for the WebAuthn API and @rails/request.js for easier requests to the backend (with built-in Turbo Stream support).
yarn add @github/webauthn-json @rails/request.js
The controller will have only two methods: create, which will be triggered by a successful response from the application, and error for a failed one.
// app/frontend/controllers/webauthn/register_controller.js

import { Controller } from "stimulus"
import * as WebAuthnJSON from "@github/webauthn-json"
import { FetchRequest } from "@rails/request.js"

export default class extends Controller {
  static targets = ["nickname"]
  static values = { callback: String }

  create(event) {
    const [data, status, xhr] = event.detail;
    const _this = this

    WebAuthnJSON.create({ "publicKey": data }).then(async function(credential) {
      const request = new FetchRequest("post", _this.callbackValue + `?nickname=${_this.nicknameTarget.value}`, { body: JSON.stringify(credential), responseKind: "turbo-stream" })
      await request.perform()
    }).catch(function(error) {
      console.log("something is wrong", error);
    });
  }

  error(event) {
    console.log("something is wrong", event);
  }
}
WebAuthnJSON.create({ "publicKey": data }) does all the hard work with WebAuthn API and returns a signed challenge and new credentials that will be sent to the callback URL for validation. We will pass the webauthn_credentials_url (Webauthn::CredentialsController#create). The request will be handled by FetchRequest as a turbo-stream thanks to the @rails/request.js library.
If you are not using Turbo in your app, you will need to remove the
responseKindoption and handle the response as JSON (seeapp/frontend/controllers/webauthn/auth_controller.jsbelow).
Here is the final version of the form with the attached stimulus controller.
<%= form_with(model: credential, url: webauthn_credentials_challenge_path(format: :json), method: :post, data: {remote: true, turbo: false, controller: "webauthn--register", "webauthn--register-callback-value": webauthn_credentials_url, action: "ajax:success->webauthn--register#create ajax:error->webauthn--register#error"}) do |f| %>
  <div class="flex mb-5 flex-row">
    <%= f.text_field :nickname, placeholder: "How it will be called?", class: "form-input block w-full rounded-md border-gray-300 shadow-sm focus:border-indigo-300 focus:ring focus:ring-indigo-200 focus:ring-opacity-50", required: true, data: {"webauthn--register-target": "nickname"} %>
    <%= f.button :button, class: "flex-grow-0 ml-1 w-11 px-3 py-2 border border-transparent text-lg leading-4 font-medium rounded-md text-white bg-green-600 hover:bg-green-500 focus:outline-none focus:border-green-700 focus:shadow-outline-indigo active:bg-green-700 transition ease-in-out duration-150" do %>
      <i class="fas fa-plus"></i>
    <% end %>
  </div>
  <%= turbo_frame_tag "webauthn_credential_error" %>
<% end %>
Challenge validation
The last thing is the create action in Webauthn::CredentialsController.
# app/controllers/webauthn/credentials_controller.rb

def create
  # Create WebAuthn Credentials from the request params
  webauthn_credential = WebAuthn::Credential.from_create(params[:credential])

  begin
    # Validate the challenge
    webauthn_credential.verify(session[:webauthn_credential_register_challenge])

    # The validation would raise WebAuthn::Error so if we are here, the credentials are valid, and we can save it
    credential = current_user.webauthn_credentials.new(
      external_id: webauthn_credential.id,
      public_key: webauthn_credential.public_key,
      nickname: params[:nickname],
      sign_count: webauthn_credential.sign_count
    )

    if credential.save
      render :create, locals: {credential: credential}, status: :created
    else
      render turbo_stream: turbo_stream.update("webauthn_credential_error", "<p class=\"text-red-500\">Couldn't add your Security Key</p>")
    end
  rescue WebAuthn::Error => e
    render turbo_stream: turbo_stream.update("webauthn_credential_error", "<p class=\"text-red-500\">Verification failed: #{e.message}</p>")
  ensure
    session.delete(:webauthn_credential_register_challenge)
  end
end
If we encounter any errors, we will send back a message with turbo_stream as an example.
When the new credential is successfully created, the create view (in our case in a turbo_stream format) will be rendered with the created credential. It will reset the form and append the newly created credential to the list.
<!-- app/views/webauthn/credentials/create.turbo_stream.erb -->

<%= turbo_stream.update("new_webauthn_credential", partial: "webauthn/credentials/form", locals: {credential: WebauthnCredential.new}) %>
<%= turbo_stream.prepend("webauthn_credentials", partial: "webauthn/credentials/credential", locals: {credential: credential}) %>
If you are not using Turbo in your app, you can use JSON responses and handle them with the Stimulus controller.
This is everything needed for registration. The whole code is available in 1-registration branch (see the comparison with main).
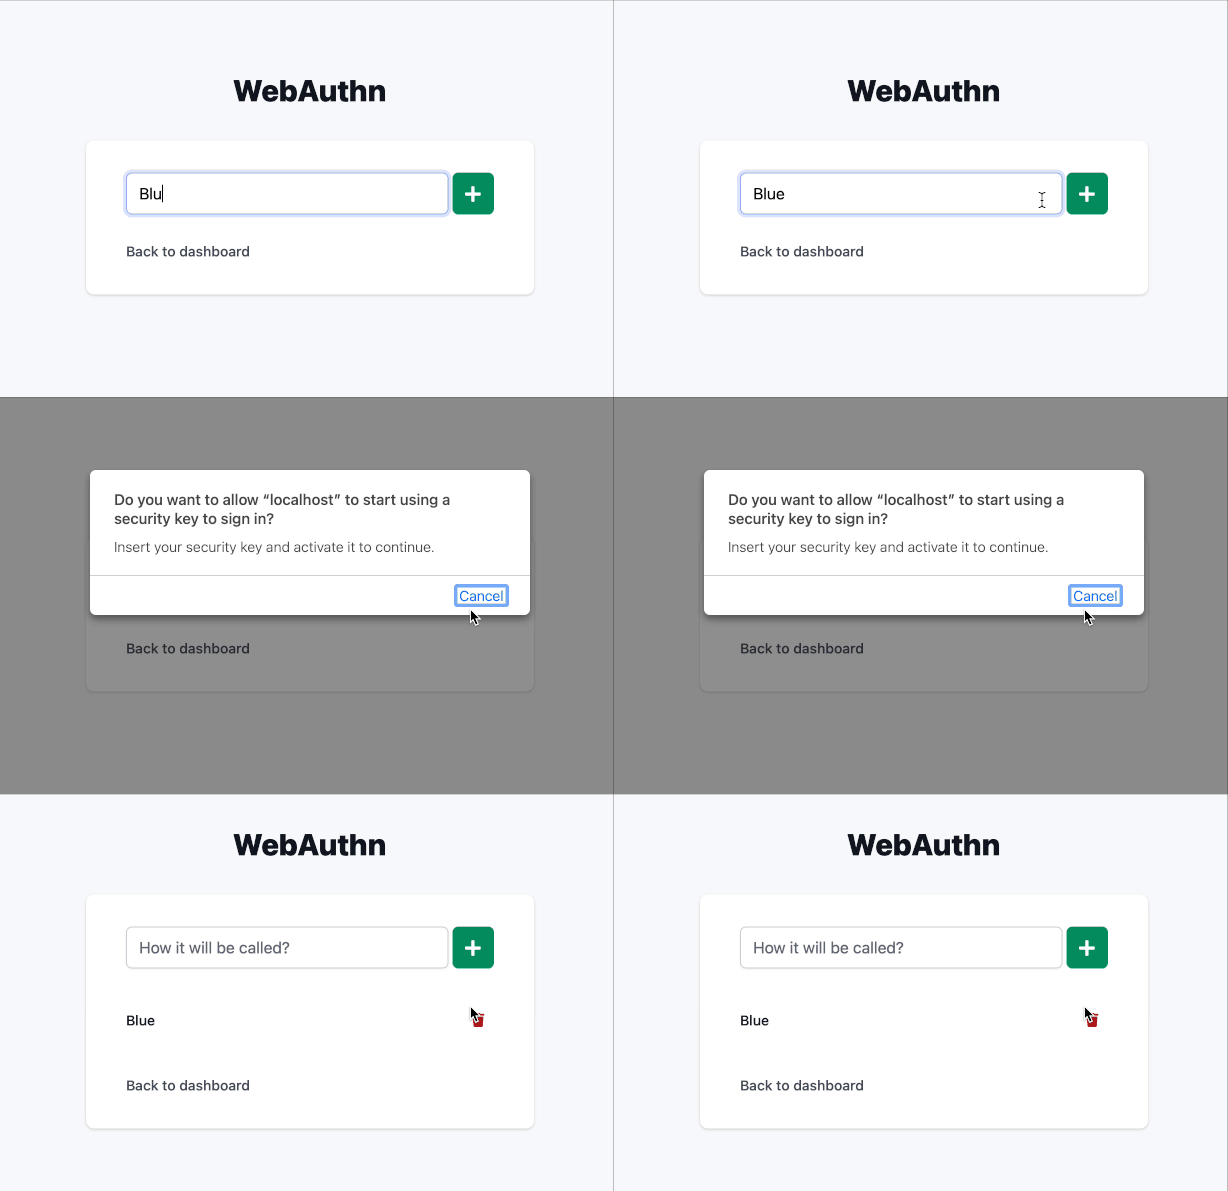
Using WebAuthn as 2FA
Session controller
To display a page where the user can use his or her authenticator, we need to override the default Devise behavior for the Session controller. Luckily, it is easy to do.
First, we will create our own controller that will inherit from Devise.
# app/controllers/users/sessions_controller.rb

class Users::SessionsController < Devise::SessionsController
  def new
    session.delete(:webauthn_authentication)
    super
  end

  def create
    self.resource = warden.authenticate!(auth_options)

    if resource.webauthn_credentials.any?
      # preserve the stored location
      stored_location = stored_location_for(resource)

      # log out the user (this will also clear stored location)
      warden.logout

      # restore the stored location
      store_location_for(resource, stored_location)

      # set session data
      session[:webauthn_authentication] = {user_id: resource.id, remember_me: params[:user][:remember_me] == "1"}

      # redirect to the webauthn page
      redirect_to webauthn_authentications_url, notice: "Use your authenticator to continue."
    else
      # continue without webauthn
      set_flash_message!(:notice, :signed_in)
      sign_in(resource_name, resource)
      yield resource if block_given?
      respond_with resource, location: after_sign_in_path_for(resource)
    end
  end
end
And tell Devise to use it:
# config/routes.rb

devise_for :users, controllers: {sessions: "users/sessions"}
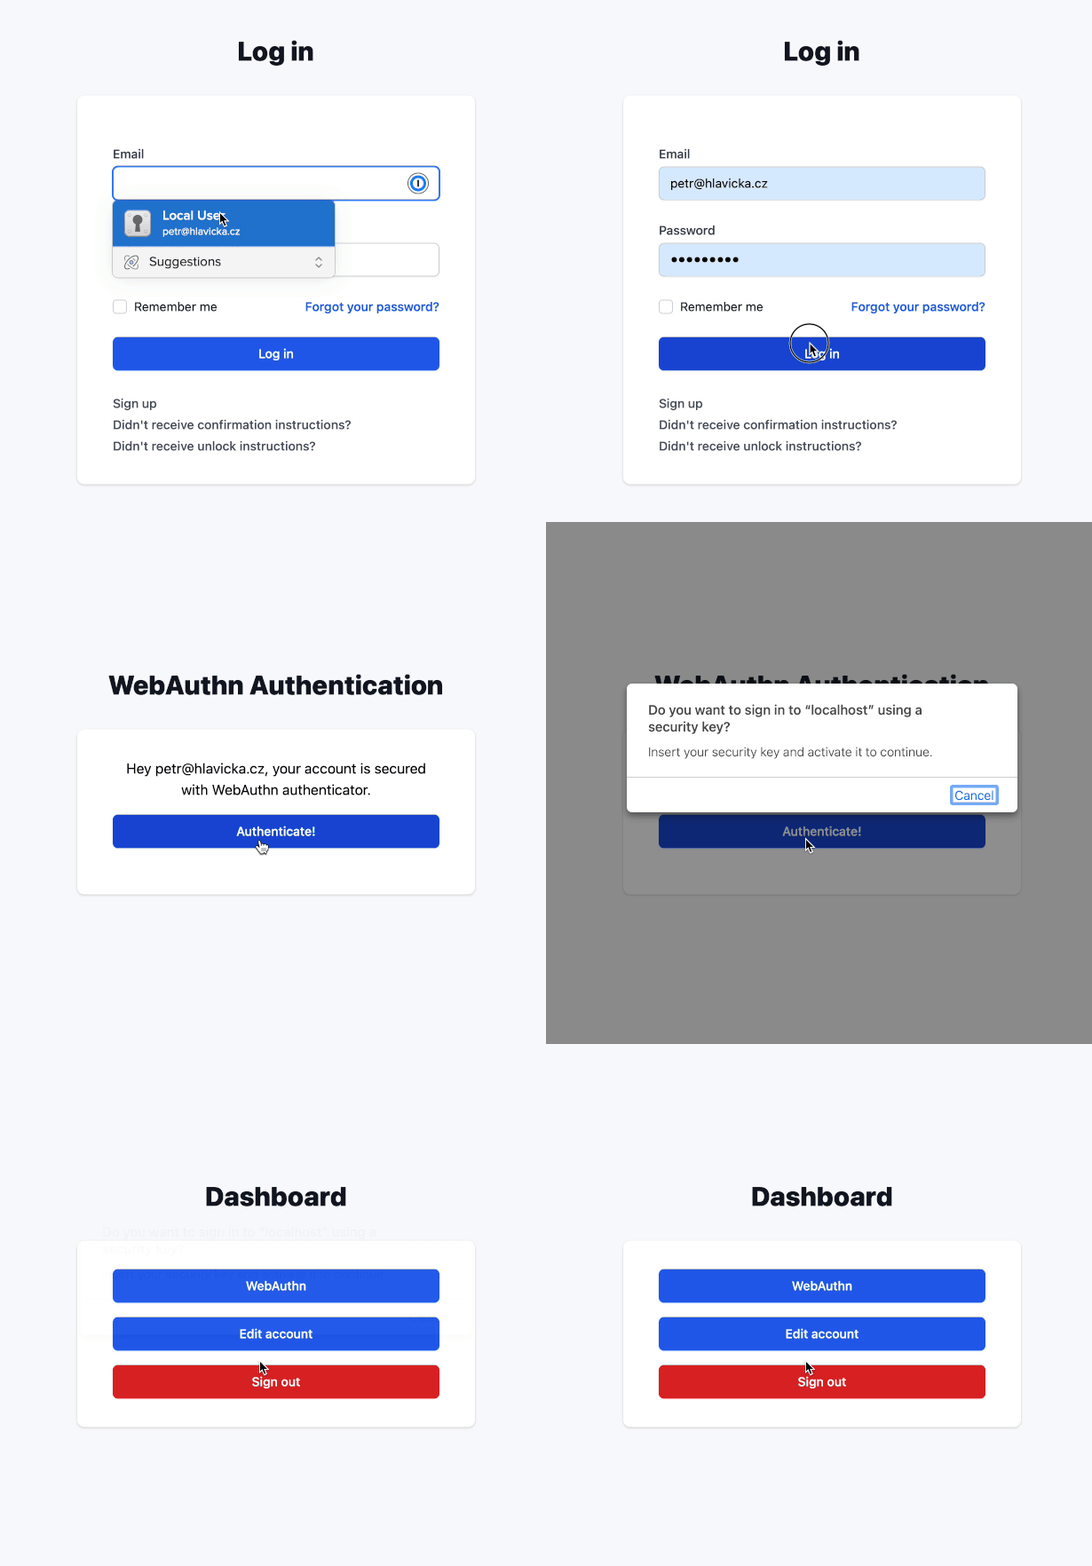
As a result, when the user enters a valid email and password, it will take him or her to a new page (that we will create below) for 2FA with WebAuthn.
Authentication with WebAuthn
The process here is very similar to the one for registration. We will request the challenge and send it back signed. If the verification on the backend passes, we will sign in the user.
Let’s start with a new Stimulus controller that will handle WebAuthn API in a very similar way as registration.
// app/frontend/controllers/webauthn/auth_controller.js

import { Controller } from "stimulus"
import * as WebAuthnJSON from "@github/webauthn-json"
import { FetchRequest } from "@rails/request.js"

export default class extends Controller {
  static values = { callback: String }

  auth(event) {
    const [data, status, xhr] = event.detail;
    const _this = this

    WebAuthnJSON.get({ "publicKey": data }).then(async function(credential) {
      const request = new FetchRequest("post", _this.callbackValue, { body: JSON.stringify(credential) })
      const response = await request.perform()

      if (response.ok) {
        const data = await response.json
        window.Turbo.visit(data.redirect, {action: 'replace'})
      } else {
        console.log("something is wrong", response);
      }
    }).catch(function(error) {
      console.log("something is wrong", error);
    });
  }

  error(event) {
    console.log("something is wrong", event);
  }
}
The main difference is in the response from the server (and the different WebAuthnJSON method). If the response is successful, it will use Turbo to “redirect” the user to a different page in a similar way as it would have been redirected after signing in without 2FA.
If you are not using Turbo in your app, you can use
Turbolinks.visitinstead ofwindow.Turbo.visit.
UI
We will also need two controllers, as in registration (or one with a custom action). The first controller will have the index action to display our new page for 2FA and the create action, where we will verify and sign in the user.
# app/controllers/webauthn/authentications_controller.rb

class Webauthn::AuthenticationsController < ApplicationController
  skip_before_action :authenticate_user!

  def index
    user = User.find_by(id: session.dig(:webauthn_authentication, "user_id"))

    if user
      render :index, locals: {
        user: user
      }
    else
      redirect_to new_user_session_path, error: "Authentication error"
    end
  end

  def create
    # prepare needed data
    webauthn_credential = WebAuthn::Credential.from_get(params)
    user = User.find(session[:webauthn_authentication]["user_id"])
    credential = user.webauthn_credentials.find_by(external_id: webauthn_credential.id)

    begin
      # verification
      webauthn_credential.verify(
        session[:webauthn_authentication]["challenge"],
        public_key: credential.public_key,
        sign_count: credential.sign_count
      )

      # update the sign count
      credential.update!(sign_count: webauthn_credential.sign_count)

      # signing the user in manually
      sign_in(:user, user)

      # set the remember me - I hope this is working solution :)
      user.remember_me! if session[:webauthn_authentication]["remember_me"]

      # set the redirect URL
      redirect = stored_location_for(user) || root_url

      # you can use flash messages here
      flash[:notice] = "Hey, welcome back!"

      render json: {redirect: redirect}, status: :ok
    rescue WebAuthn::Error => e
      render json: "Verification failed: #{e.message}", status: :unprocessable_entity
    ensure
      session.delete(:webauthn_authentication)
    end
  end
end
The skip_before_action :authenticate_user! is important here, as the user is not yet authenticated.
The index view will contain a form with our new Stimulus controller.
<!-- app/views/webauthn/authentications/index.html.erb -->

<% content_for(:title, 'WebAuthn Authentication') %>

<p class="mb-4 text-center">Hey <%= user.email %>, your account is secured with WebAuthn authenticator.</p>

<%= form_with(url: webauthn_authentications_challenge_url(format: :json), method: :post, data: {remote: true, turbo: false, controller: "webauthn--auth", "webauthn--auth-callback-value": webauthn_authentications_url, action: "ajax:success->webauthn--auth#auth ajax:error->webauthn--auth#error"}) do |f| %>
  <div class="flex mb-5 flex-row">
    <%= f.button :button, class: "w-full flex justify-center py-2 px-4 border border-transparent rounded-md shadow-sm text-sm font-medium text-white bg-blue-600 hover:bg-blue-700 focus:outline-none focus:ring-2 focus:ring-offset-2 focus:ring-blue-500" do %>
      Authenticate!
    <% end %>
  </div>
<% end %>
The last controller is for the challenge.
# app/controllers/webauthn/authentications/challenges_controller.rb

class Webauthn::Authentications::ChallengesController < ApplicationController
  skip_before_action :authenticate_user!

  def create
    user = User.find_by(id: session[:webauthn_authentication]["user_id"])

    if user
      # prepare WebAuthn options
      get_options = WebAuthn::Credential.options_for_get(allow: user.webauthn_credentials.pluck(:external_id))

      # save the challenge
      session[:webauthn_authentication]["challenge"] = get_options.challenge

      respond_to do |format|
        format.json { render json: get_options }
      end
    else
      respond_to do |format|
        format.json { render json: {message: "Authentication failed"}, status: :unprocessable_entity }
      end
    end
  end
end
Summary
When the user enters his or her credentials on the log-in form, it will be redirected (thanks to our new Users::SessionsController) to the new page for 2FA (Webauthn::AuthenticationsController#index). When the 2FA form is submitted, it will send request for a challenge (Webauthn::Authentications::ChallengesController#create), which will be processed by the Stimulus controller. If the user’s authenticator is provided, it will send the signed challenge back to the server for verification (Webauthn::AuthenticationsController#create). If the verification passes, the user will be signed in, and the controller will respond with the redirect URL that the Stimulus controller uses for redirection.
If you use WebAuthn for MFA, you should also generate some recovery key(s) for the user, so he or she will be able to recover access to his or her account when access to the authenticator is lost (e.g., in the event of a lost security key).
The whole code is available in 2-2fa branch (see the comparison with 1-registration).
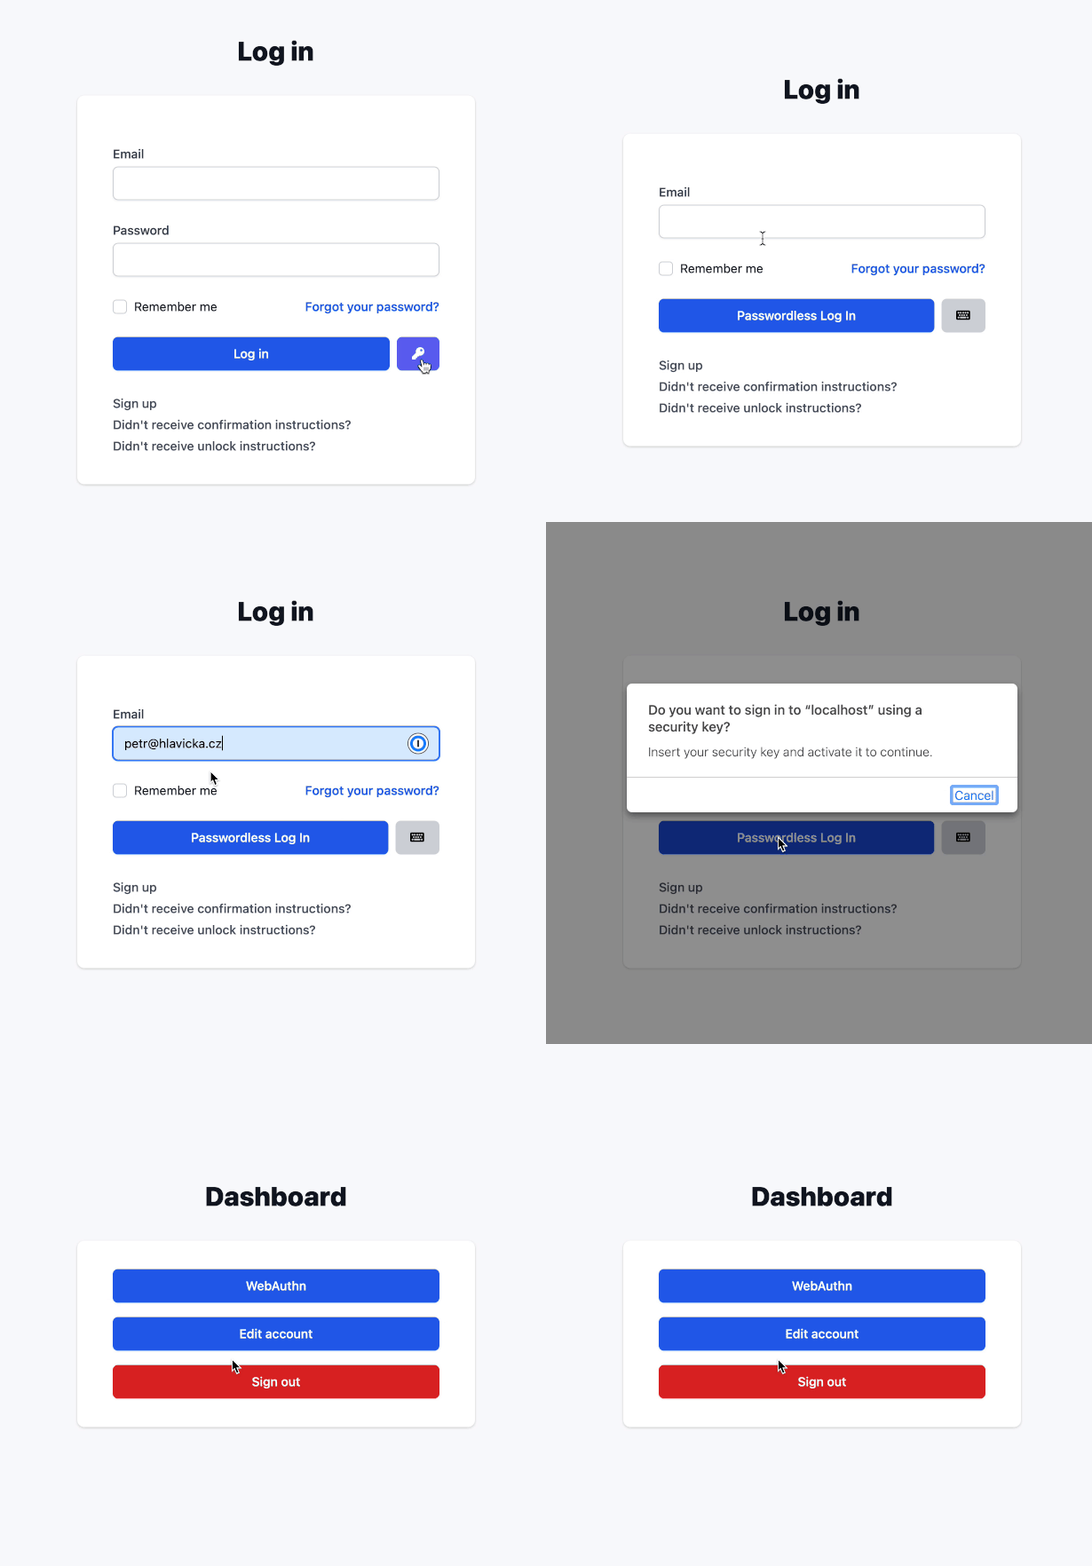
Using “passwordless” authentication
We have almost everything prepared for passwordless login. We will only change the login form to support it with a small change in one controller.
Login form
Unless you force your users to have WebAuthn enabled, there will be users without it. This means we need to allow users to log in with or without a password.
A simple toggle button will do the work. For passwordless log in, we will hide the password field and change the form to submit it to the Webauthn::Authentications::ChallengesController controller instead of Users::SessionsController.
We will inherit from our previous Stimulus controller for authentication and add the new method to toggle the form.
// app/frontend/controllers/webauthn/login_controller.js

import AuthController from "./auth_controller"

export default class extends AuthController {
  static targets = ["email", "password", "default", "webauthn"]
  static values = {
    callback: String,
    webauthn: String
  }

  connect() {
    this.webauthn = true
    this.defaultActionUrl = this.element.getAttribute("action")
  }

  toggle(event) {
    event.preventDefault()
    this.passwordTarget.classList.toggle("hidden")
    this.defaultTarget.classList.toggle("hidden")
    this.webauthnTarget.classList.toggle("hidden")

    if(this.webauthn) {
      this.element.setAttribute("data-remote", true)
      this.element.setAttribute("data-turbo", false)
      this.element.setAttribute("action", this.webauthnValue)
    } else {
      this.element.setAttribute("data-remote", false)
      this.element.setAttribute("data-turbo", true)
      this.element.setAttribute("action", this.defaultActionUrl)
    }

    this.webauthn = !this.webauthn
  }
}
If you are not using Turbo in your app, you can remove the parts that handle
data-turbo.
We will use the same controller as the one used for 2FA. We will need to find the user by email (as it will be sent from the form and not provided by session by Devise) and also prepare session data. Here are the changes.
# app/controllers/webauthn/authentications/challenges_controller.rb#5

user = if params.dig(:user, :email)
  # passwordless
  User.find_by(email: params[:user][:email])
else
  # 2fa
  User.find_by(id: session[:webauthn_authentication]["user_id"])
end
# app/controllers/webauthn/authentications/challenges_controller.rb#17

# prepare session for passwordless
session[:webauthn_authentication] ||= {}
unless session[:webauthn_authentication]["user_id"]
  session[:webauthn_authentication]["user_id"] = user.id
  session[:webauthn_authentication]["remember_me"] = params.dig(:user, :remember_me) == "1"
end
The whole code is available in 3-passwordless branch (see the comparison with 2-2fa).
Preview with security key
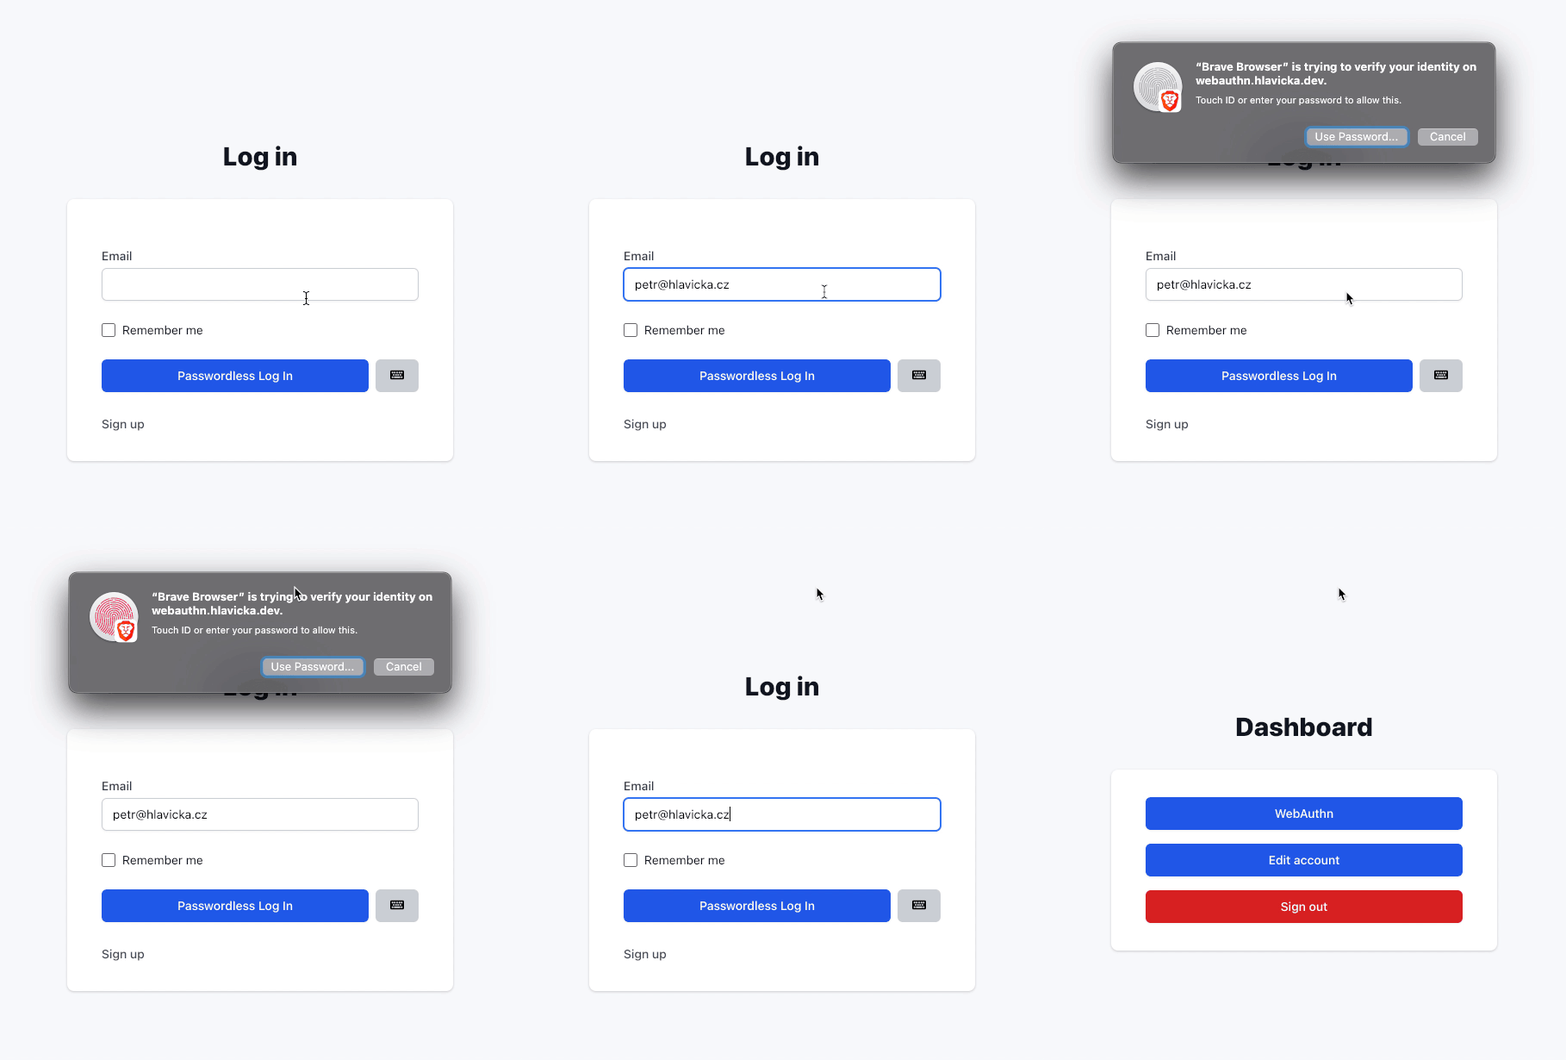
Preview with Touch ID
A few notes in the end
- When you register a security key, you can use it with any device (if the key has NFC, you can even use it with a mobile phone or tablet) and any browser.
- When you register Touch ID (e.g., on MacBook), you can use it only within the browser that you used for registration. Touch ID needs a browser to create a pair. You can, of course, register it within every browser you have on the computer.


