As Laravel web developers, we often need to build Artisan commands for our applications. But interacting with the console can sometimes feel a little cumbersome. Laravel Prompts is a package that aims to improve this experience by providing a simple approach to user-friendly forms in the console.
In this article, we'll take a look at Laravel Prompts and some of its features that you can use. We'll then build a simple GitHub CLI client using Prompts to demonstrate how to use it in your applications. Finally, we'll show how to write tests for your Prompts commands.
By the end of the article, you should understand how to use Prompts in your applications and how to test them.
What is Laravel Prompts?
Laravel Prompts is a first-party package built by the Laravel team. It provides a simple way to add forms with browser-like functionality to your Artisan terminal commands. For example, it provides the ability to define input placeholders, validation rules, default values, loading spinners, and more.
If you're new to Artisan commands in Laravel, you might want to check out my article on Processes and Artisan commands in Laravel, which covers what they are, how to use them, and how to test them.
Basic usage of Prompts
Laravel Prompts provides many console features that you can use in your Artisan commands. Let's explore some of the most common ones.
You can check out the official documentation for a complete list of features.
Text input
Prompts provides a text helper that you can use to create a text input field in your forms.
use function Laravel\Prompts\text;

$name = text('What is your favorite programming language?');
That little bit of code produces the following terminal UI:
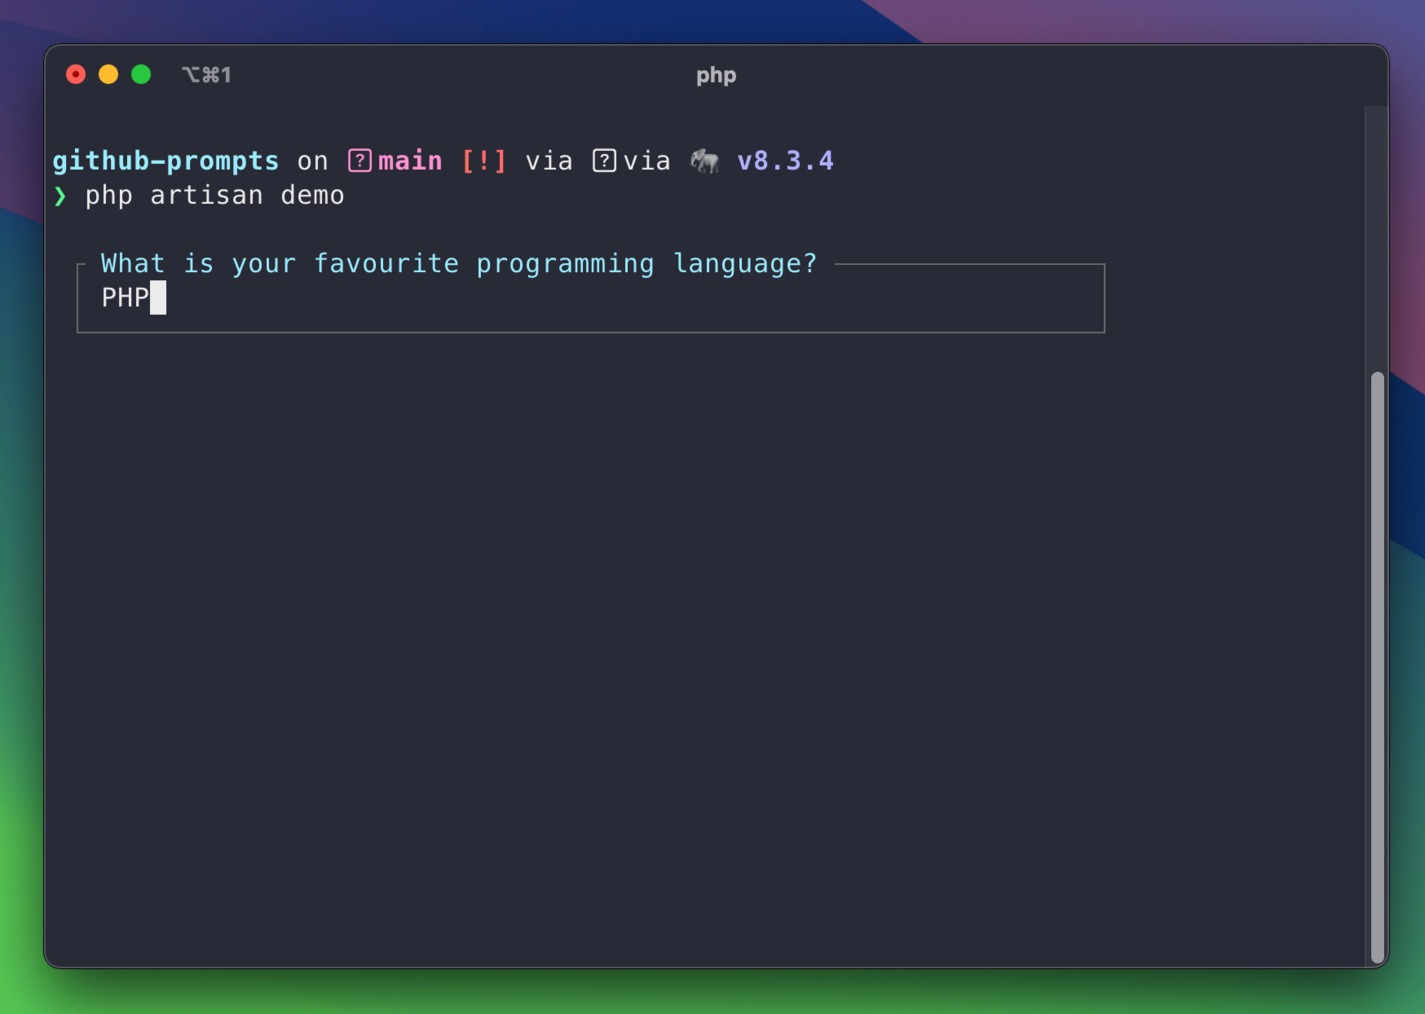
If the user enters PHP (as shown in the screenshot above), the $name variable will contain the string PHP. If they were to leave it blank, the $name variable would be an empty string.
The text helper also provides a few extra options that you can use to customize the input field:
use function Laravel\Prompts\text;
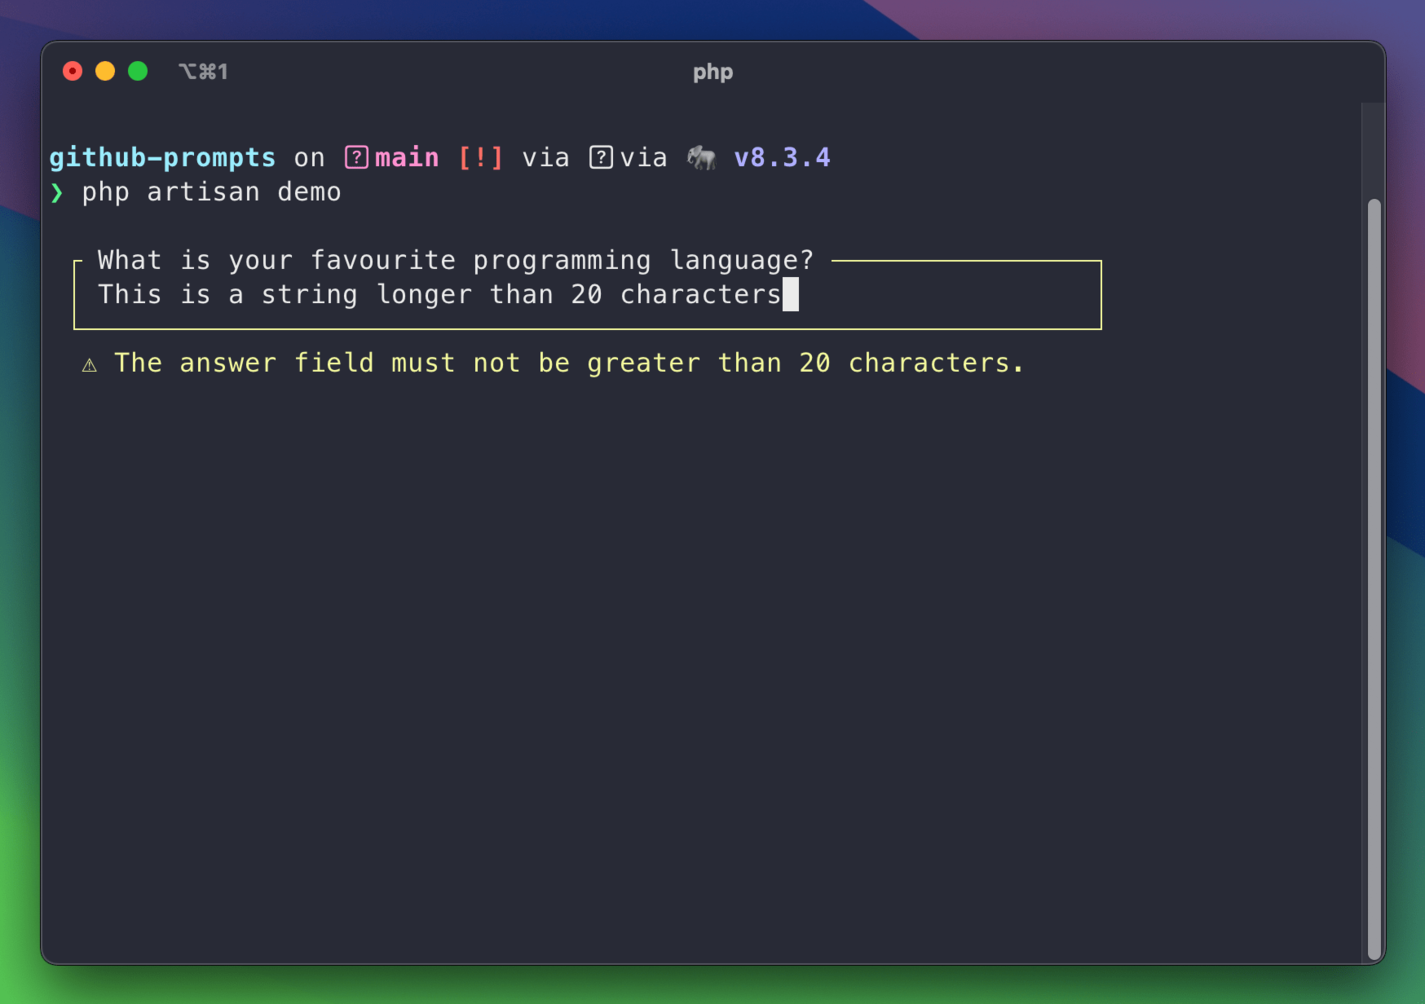
$name = text(
label: 'What is your programming language?',
default: 'PHP',
required: true,
validate: ['max:20'],
);
In the code example above, we're setting a default value for the textbox of PHP, making it a required field, and setting a validation rule that the input must be a maximum of 20 characters long. If the user tries to enter more than 20 characters or leaves the input blank, they'll see an error message and can try again:
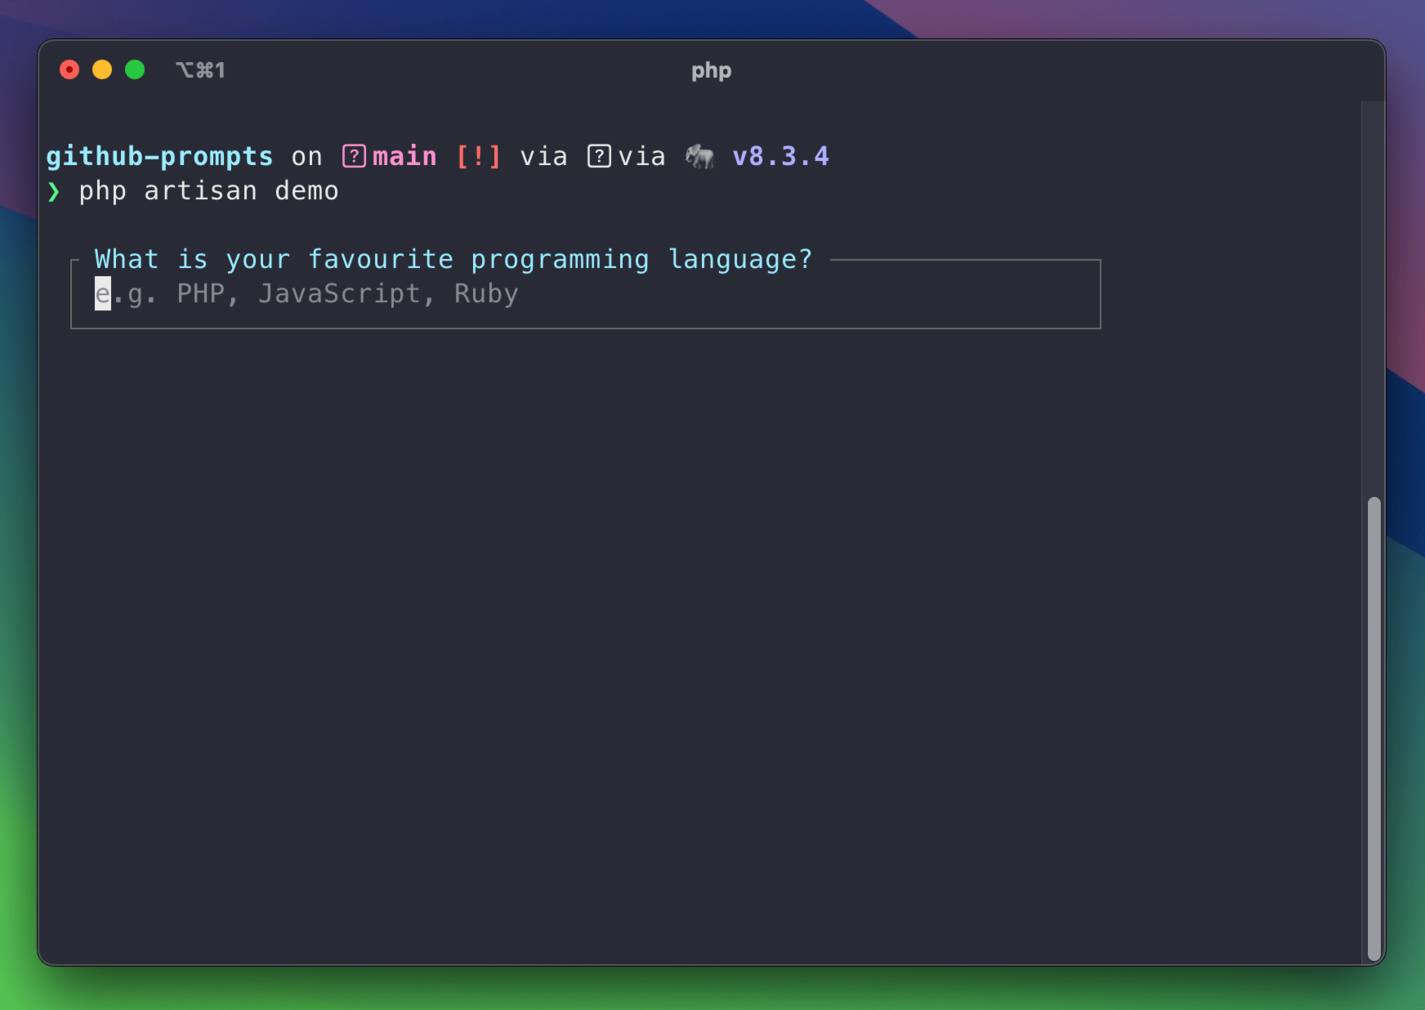
Similarly, we can also add a placeholder to the input field:
use function Laravel\Prompts\text;

$name = text(
    label: 'What is your favorite programming language?',
    placeholder: 'e.g. PHP, JavaScript, Ruby',
);
Which generates the following prompt:
Password input
Prompts also provides a password helper that allows a user to input text without it being displayed in the console. This is useful when you want to hide sensitive information like passwords, API tokens, etc.
You can use it in a similar way to the text helper:
use function Laravel\Prompts\password;

$password = password(
    label: 'Enter your GitHub API token:',
    placeholder: 'token-goes-here',
    hint: 'Your personal access token',
);
Which results in a password input:

Confirm input
There's a handy confirm helper that you can use to ask the user to confirm something, which is useful when you want the user to explicitly confirm they're happy to perform a potentially destructive action (such as deleting data):
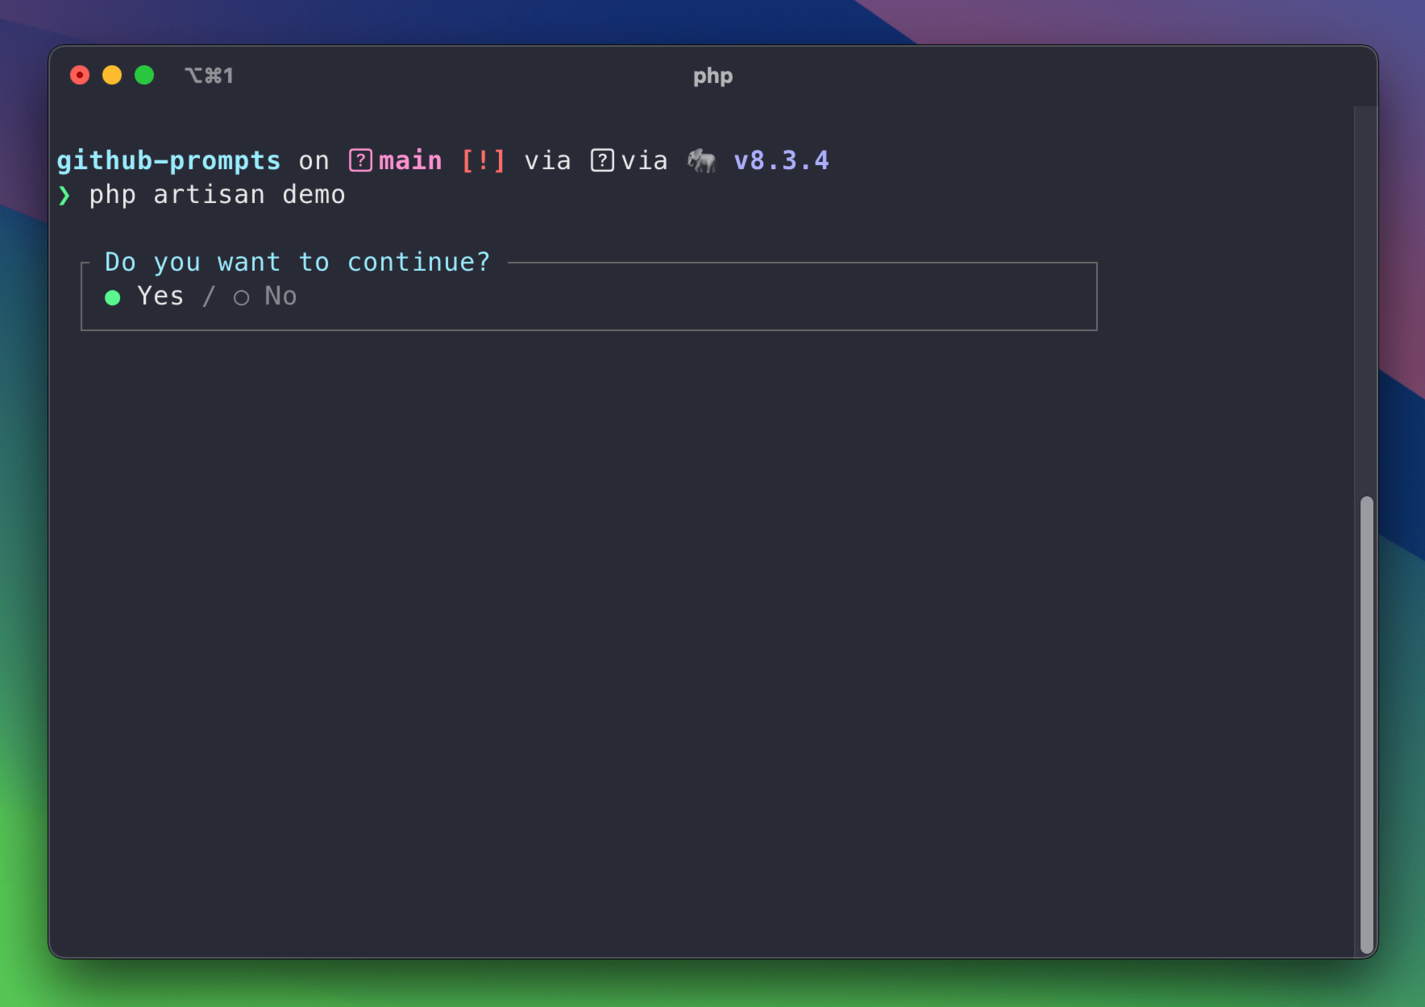
use function Laravel\Prompts\confirm;

$confirmed = confirm('Do you want to continue?');
Which produces a confirmation:
You can then use the result of the input like so:
use function Laravel\Prompts\confirm;

$confirmed = confirm('Do you want to continue?');

if (!$confirmed) {
    // "No" was selected.
}

// Continue as normal.
The confirm helper also provides a few extra options that you can use to customize it:
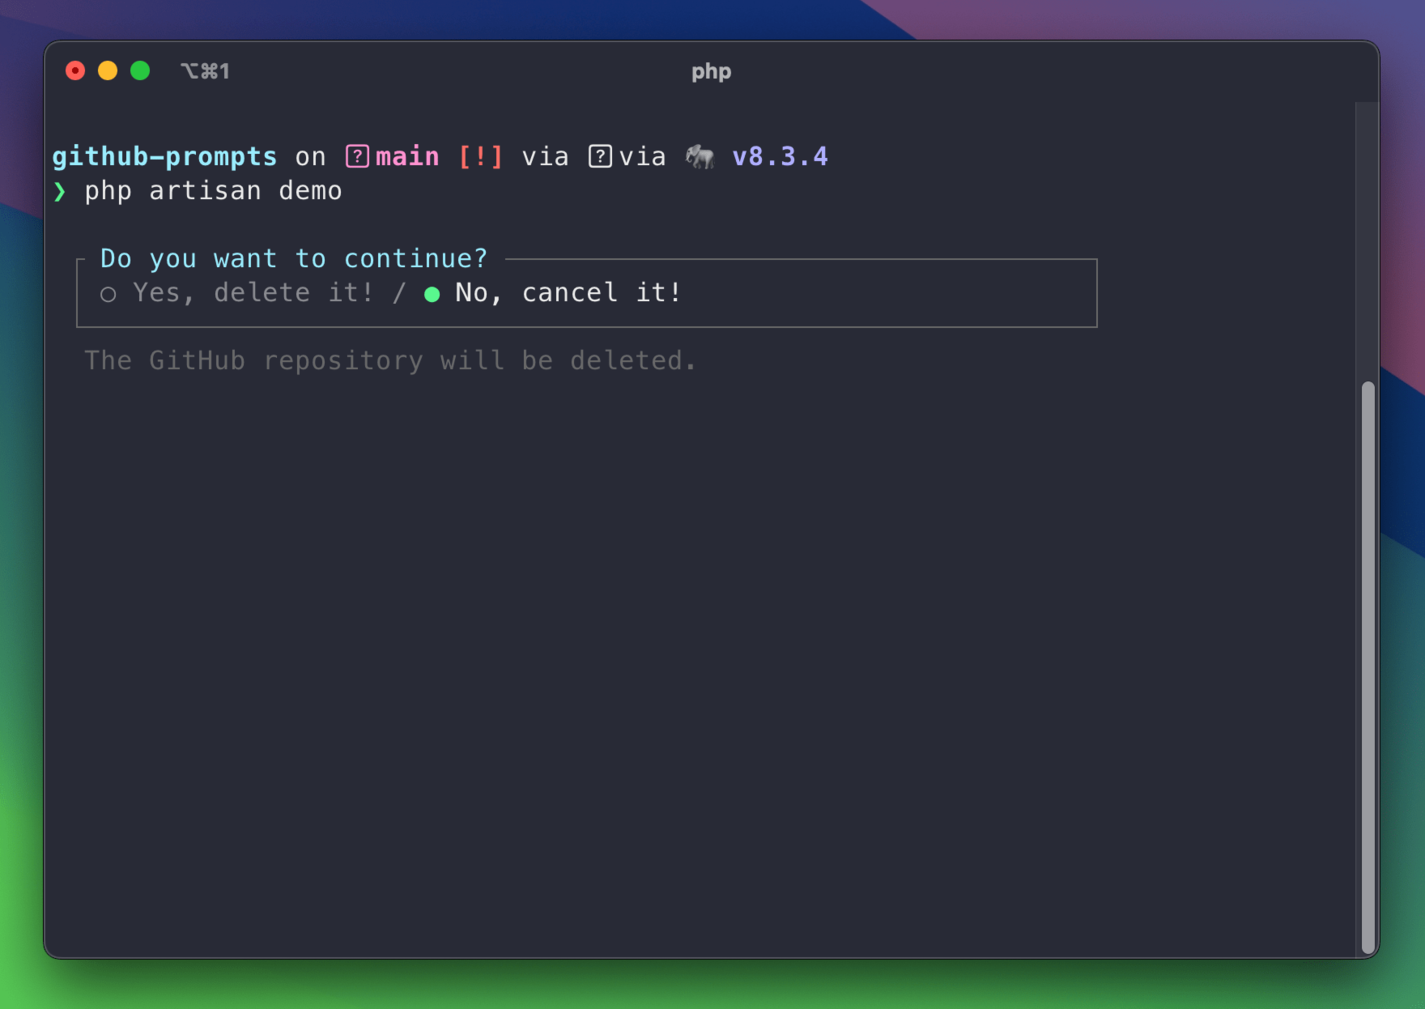
$confirmed = confirm(
    label: 'Do you want to continue?',
    default: false,
    yes: 'Yes, delete it!',
    no: 'No, cancel it!',
    hint: 'The GitHub repository will be deleted.'
);
These options produce an input that's a bit easier to understand:
Select input
You can use the handy select helper to get input from the user from a list of options. It is also helpful if you need to display a menu—we'll use this one later in the tutorial.
Let's take a look at how you can use the select helper:
use function Laravel\Prompts\select;

$role = select(
    label: 'What is your favorite programming language?',
    options: [
        'php' => 'PHP',
        'js' => 'JavaScript',
        'ruby' => 'Ruby',
    ],
);
This code creates a multi-choice menu:
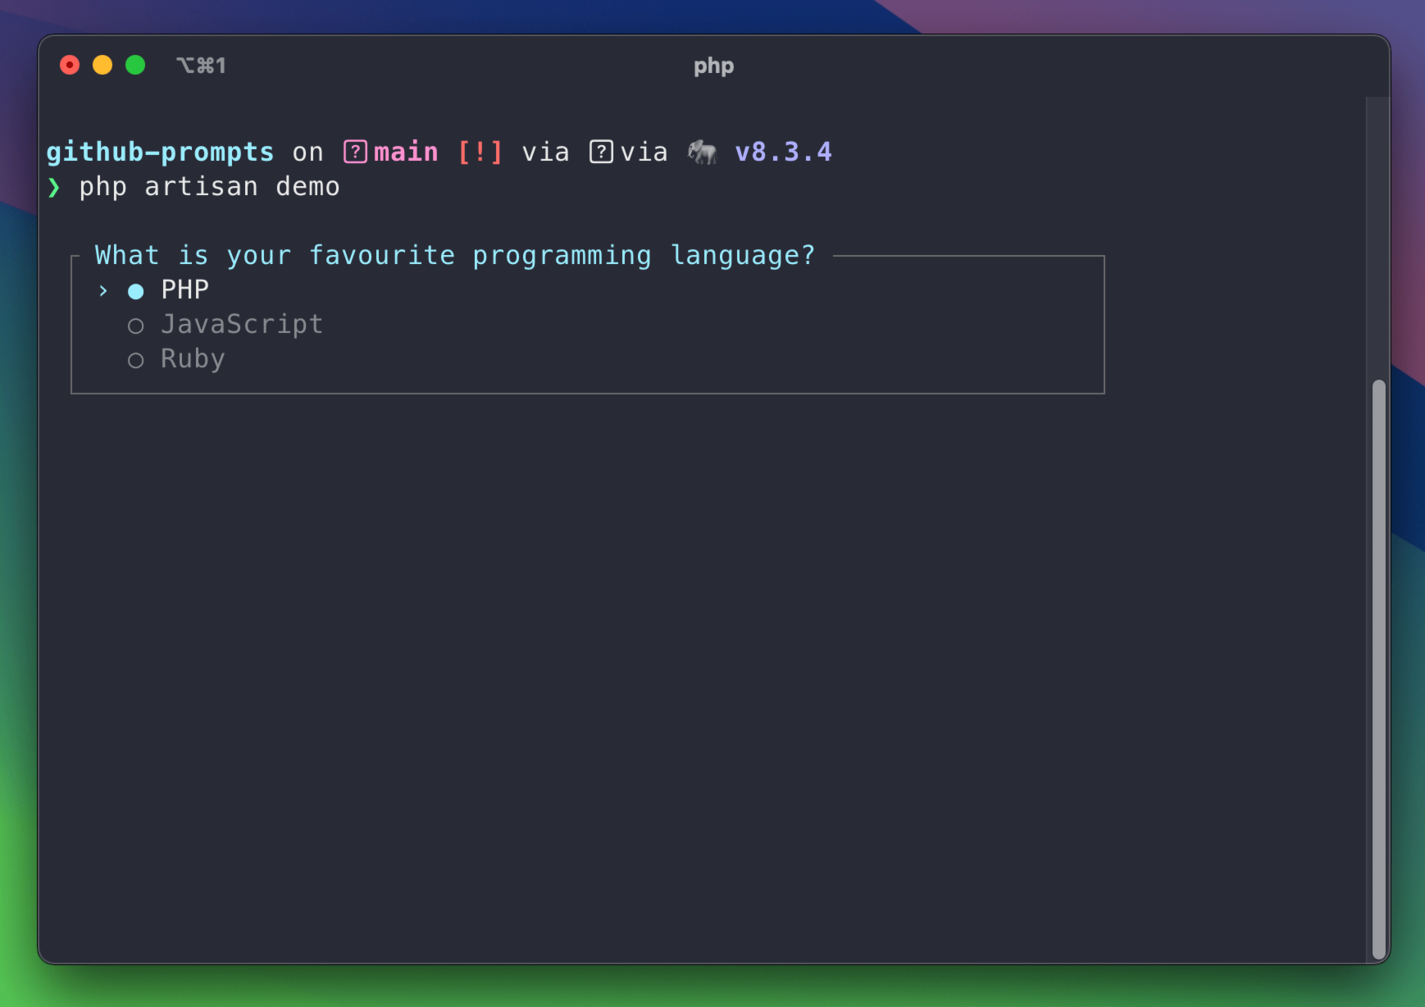
If the user were to select the "JavaScript" option, then the $role variable would contain the string js.
Pause input
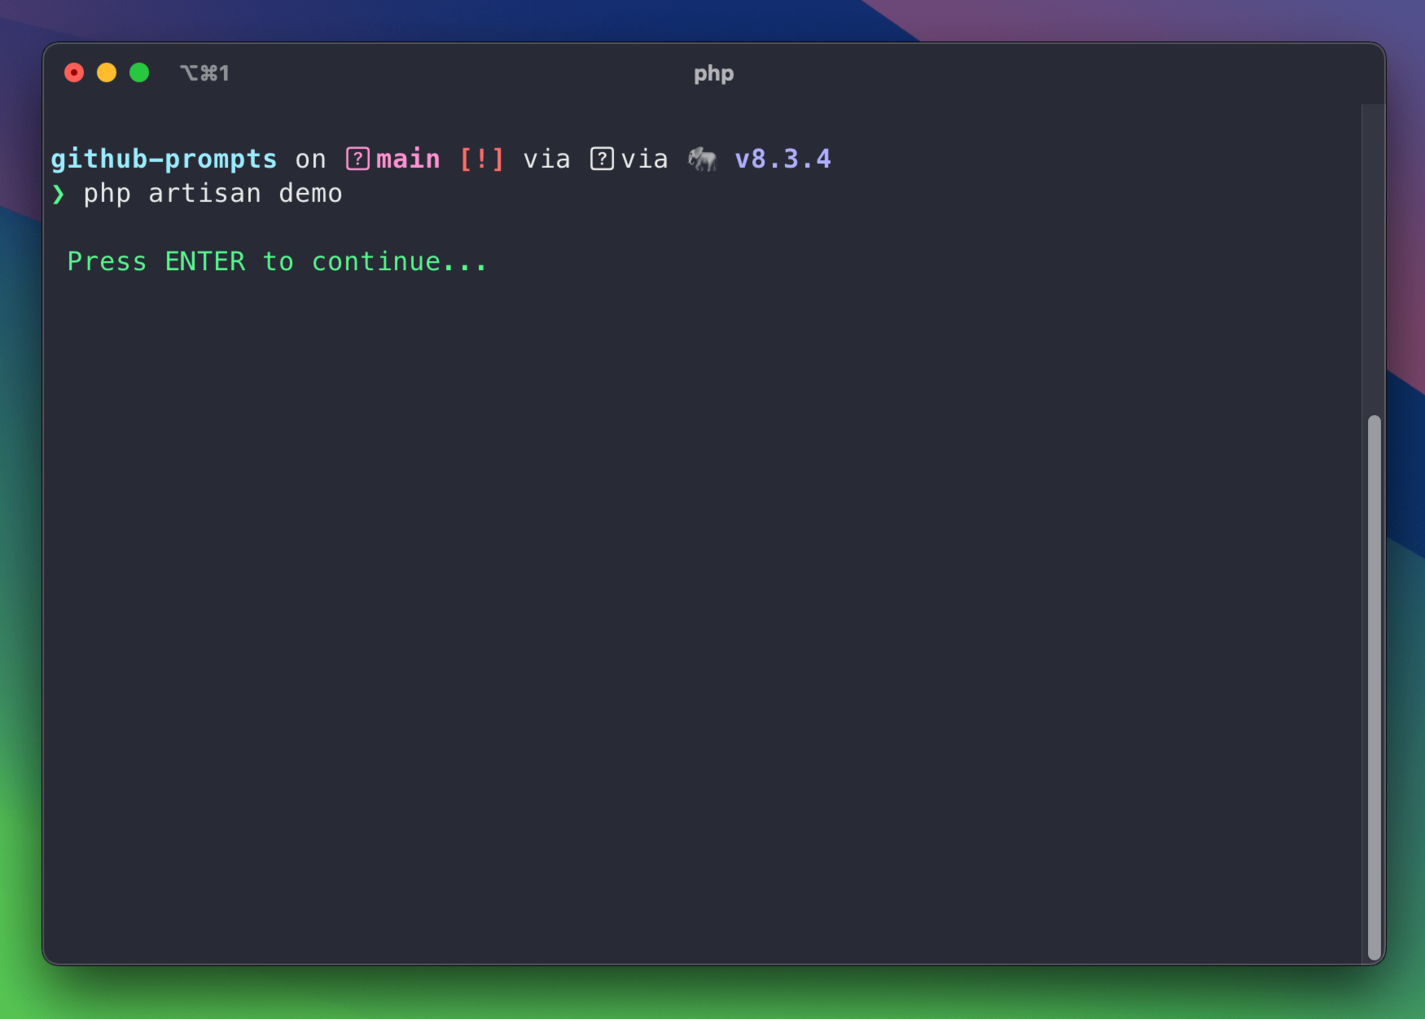
Another handy prompt is the pause helper, which can pause the execution of the command and wait for the user to press a key before continuing. It's useful when you want to display some information in the console and only continue when the user is ready.
You can use the pause helper like this:
use function Laravel\Prompts\pause;

pause('Press ENTER to continue...');
To generate the following prompt:
Forms
My favorite feature of Prompts is the ability to tie the different prompts together to create a form. It makes it easy to gather information from the user in a structured way using chained method calls rather than using the Prompts individually.
You can do this using the form helper:
$form = form()
    ->text(
        label: 'Repo name:',
        required: true,
        validate: ['max:100'],
        name: 'repo_name'
    )
    ->confirm(
        label: 'Private repo?',
        name: 'is_private'
    )
    ->submit();
This would result in the following form:
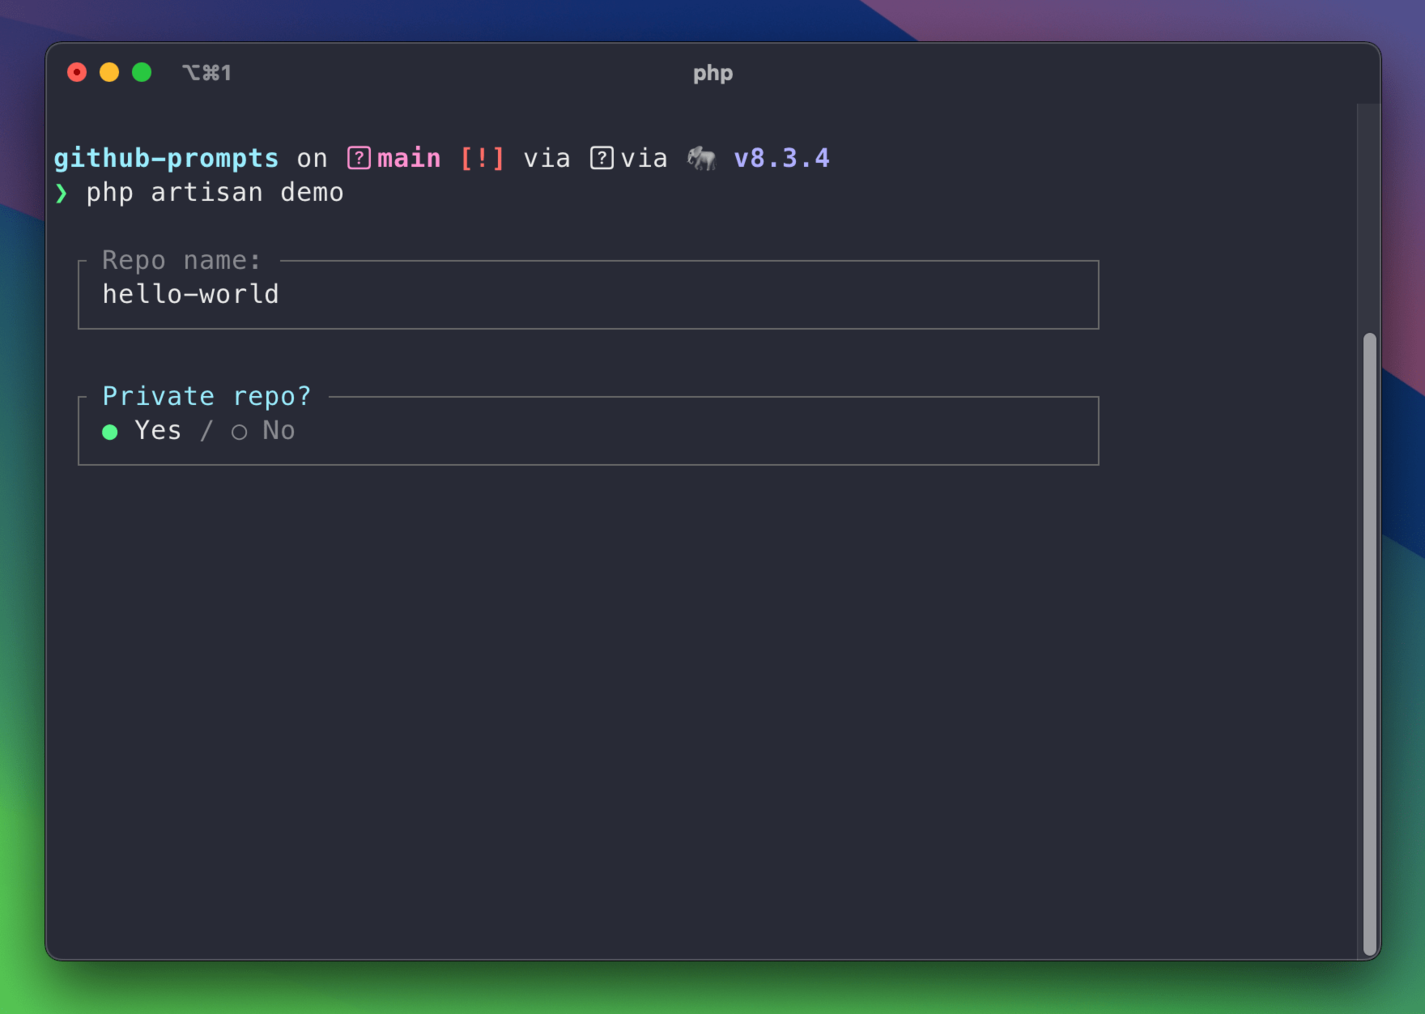
In the simple example above, we're defining a form that contains a text input field and a confirmation field. We then use the submit method to display the form to the user and gather the input.
If the user were to input a repo name of Hello-World and select that the repo should be private, then the $form variable would be an array like so:
[
    'repo_name' => 'Hello-World',
    'is_private' => true,
];
Building a simple GitHub CLI client with Prompts
Now that we know what Prompts can do, let's tie it together by building a simple Artisan command.
We'll build a basic command to interact with the GitHub API to:
- List the repositories belonging to the given user.
- Create a new repository.
By the end of this section, you'll have a simple command like this:
Limitations
Before we get stuck into any code, I need to mention the limitations of this example.
I've chosen to interact with the GitHub API because you're probably already familiar with GitHub. Focusing on the Prompts functionality and code will be easier than on the API itself.
Since we don't want to get bogged down in the details of the GitHub API, we're going to ignore a few things:
- The GitHub API endpoint for listing the user's repositories is paginated. We're going to ignore this and return the first page. In a real-world application, you'd want to handle pagination.
- We won't be adding any error handling related to the API. You'd want to handle this in a real-world application to give the user a better experience.
Now that we've got that out of the way—let's get started!
Setting the configuration
First, you must create a personal access token to interact with the GitHub API. Once you've created it, you can add it to your .env file like so:
GITHUB_TOKEN=your-token-goes-here
So that we can access this token in our application, we'll add a github.token field to our config/services.php file like so:
return [

    // ...

    'github' => [
        'token' => env('GITHUB_TOKEN'),
    ],

];
This means we can now access the token using config('services.github.token').
Creating and binding the interface
Now, let's prepare the code for our GitHub API client that the command will use. We'll create a new App\Interfaces\GitHub\GitHub interface to define the methods we need to interact with the GitHub API.
We're using an interface here so that we can swap out the implementation of the GitHub API client later—this makes testing much easier because we can swap out our implementation for a test double that doesn't make any API requests.
The interface will define two methods:
listRepos- This method returns a collection of repositories from GitHub belonging to the user.createRepo- This method creates a new repository on GitHub.
The interface may look something like this:
namespace App\Interfaces\GitHub;

use App\Collections\GitHub\RepoCollection;
use App\DataTransferObjects\GitHub\NewRepoData;
use App\DataTransferObjects\GitHub\Repo;

interface GitHub
{
    public function listRepos(): RepoCollection;

    public function createRepo(NewRepoData $repoData): Repo;
}
You may have noticed that we're also mentioning three classes that we've not created yet: App\Collections\GitHub\RepoCollection, App\DataTransferObjects\GitHub\NewRepoData, and App\DataTransferObjects\GitHub\Repo. We'll create these classes in the next section.
Next, we want to create a binding for the interface in Laravel's service container. This will allow Laravel to resolve an instance of our intended implementation when we use dependency injection to request an interface instance. Don't worry if this doesn't make sense—it'll make more sense when we create the command.
To create the binding, we can use the $this->app->bind method in the register method of our App\Providers\AppServiceProvider class. We've defined that whenever we attempt to resolve an instance of App\Interfaces\GitHub\GitHub, Laravel should return an instance of App\Services\GitHub\GitHubService (we'll create this class later in the article). We'll also pass the GitHub token from the configuration (that we set earlier) to the constructor of the App\Services\GitHub\GitHubService:
namespace App\Providers;

use App\Interfaces\GitHub\GitHub;
use App\Services\GitHub\GitHubService;
use Illuminate\Support\ServiceProvider;

class AppServiceProvider extends ServiceProvider
{
    public function register(): void
    {
        $this->app->bind(
            abstract: GitHub::class,
            concrete: fn (): GitHubService => new GitHubService(
                token: config('services.github.token'),
            )
        );
    }
}
Creating the collection and data transfer objects
Now, let's create the three classes that we mentioned earlier:
App\DataTransferObjects\GitHub\Repo- This will hold the data for a single repository.App\DataTransferObjects\GitHub\NewRepoData- This will hold the data needed to create a new repository on GitHub.App\Collections\GitHub\RepoCollection- This is an instance of Laravel'sIlluminate\Support\Collectionthat will hold multipleApp\DataTransferObjects\GitHub\Repoobjects that we retrieve from the GitHub API.
The App\DataTransferObjects\GitHub\Repo may look like:
declare(strict_types=1);

namespace App\DataTransferObjects\GitHub;

use Carbon\CarbonInterface;

final readonly class Repo
{
    public function __construct(
        public int $id,
        public string $owner,
        public string $name,
        public bool $private,
        public string $description,
        public CarbonInterface $createdAt,
    ) {
        //
    }
}
The App\DataTransferObjects\GitHub\NewRepoData may look like this:
declare(strict_types=1);

namespace App\DataTransferObjects\GitHub;

final readonly class NewRepoData
{
    public function __construct(
        public string $name,
        public bool $private,
    ) {
        //
    }
}
And here's the App\Collections\GitHub\RepoCollection:
declare(strict_types=1);

namespace App\Collections\GitHub;

use App\DataTransferObjects\GitHub\Repo;
use Illuminate\Support\Collection;

/** @extends Collection<int,Repo> */
final class RepoCollection extends Collection
{
    //
}
Creating the API client
Let's create the App\Services\GitHub\GitHubService class that implements the App\Interfaces\GitHub\GitHub interface we created earlier. This class will interact with the GitHub API and return the data in our desired format.
Let's take a look at what the class might look like, and then we'll break down what's happening:
declare(strict_types=1);

namespace App\Services\GitHub;

use App\Collections\GitHub\RepoCollection;
use App\DataTransferObjects\GitHub\NewRepoData;
use App\DataTransferObjects\GitHub\Repo;
use App\Interfaces\GitHub\GitHub;
use Carbon\CarbonImmutable;
use Illuminate\Http\Client\PendingRequest;
use Illuminate\Support\Facades\Http;

final class GitHubService implements GitHub
{
    private const BASE_URL = 'https://api.github.com';

    public function __construct(
        public readonly string $token
    ) {
        //
    }

    public function listRepos(): RepoCollection
    {
        $repos = $this->client()
            ->get(url: '/user/repos')
            ->collect()
            ->map(fn (array $repo): Repo => $this->buildRepoFromResponseData($repo));

        return RepoCollection::make($repos);
    }

    public function createRepo(NewRepoData $repoData): Repo
    {
        $repo = $this->client()
            ->post(
                url: '/user/repos',
                data: [
                    'name' => $repoData->name,
                    'private' => $repoData->private,
                ]
            )
            ->json();

        return $this->buildRepoFromResponseData($repo);
    }

    private function buildRepoFromResponseData(array $repo): Repo
    {
        return new Repo(
            id: $repo['id'],
            owner: $repo['owner']['login'],
            name: $repo['name'],
            private: $repo['private'],
            description: $repo['description'] ?? '',
            createdAt: CarbonImmutable::create($repo['created_at']),
        );
    }

    private function client(): PendingRequest
    {
        return Http::withToken($this->token)
            ->baseUrl(self::BASE_URL)
            ->throw();
    }
}
As we can see, we've defined a BASE_URL constant on the class that holds the base URL for all the requests we'll make to the GitHub API. We've also used constructor property promotion to define the $token property and assign it a value from the constructor. This is the personal access token that we stored earlier in the .env file and passed to the service when creating our binding.
We then have two public methods that are enforced by the App\Interfaces\GitHub\GitHub interface we created earlier.
The first is the listRepos method that makes a GET request to the /user/repos endpoint on the GitHub API. It then maps over the response data and creates a new App\DataTransferObjects\GitHub\Repo object for each repository. These are then added to an App\Collections\GitHub\RepoCollection object and returned.
The second is the createRepo method that makes a POST request to the /user/repos endpoint on the GitHub API. It sends the name and privacy status of the new repository in the request body. It then returns a new App\DataTransferObjects\GitHub\Repo object from the response data.
In a real-life project, you'd likely want to add extra things like error handling, pagination handling, caching, etc. But for this article, we're keeping it simple to focus more on the Prompts.
Now that our API client is ready, let's create the Artisan command.
Creating the command
To create our command, we'll first run the following Artisan command:
php artisan make:command GitHubCommand
We'll then update the command's signature and description to something meaningful:
declare(strict_types=1);

namespace App\Console\Commands;

use Illuminate\Console\Command;

final class GitHubCommand extends Command
{
    protected $signature = 'github';

    protected $description = 'Interact with GitHub using Laravel Prompts';

    // ...
}
This means we can now run our command with php artisan github in our terminal.
Next, we'll update our handle method to display a welcome message and then call a new method called displayMenu, which will display the main menu for the command:
declare(strict_types=1);

namespace App\Console\Commands;

use App\Interfaces\GitHub\GitHub;
use Illuminate\Console\Command;

use function Laravel\Prompts\info;
use function Laravel\Prompts\select;

final class GitHubCommand extends Command
{
    protected $signature = 'github';

    protected $description = 'Interact with GitHub using Laravel Prompts';

    private GitHub $gitHub;

    public function handle(GitHub $gitHub): int
    {
        $this->gitHub = $gitHub;

        info('Interact with GitHub using Laravel Prompts!');

        $this->displayMenu();

        return self::SUCCESS;
    }

    private function displayMenu(): void
    {
        match ($this->getMenuChoice()) {
            'list' => $this->listRepositories(),
            'create' => $this->createRepository(),
            'exit' => null,
        };
    }

    private function getMenuChoice(): string
    {
        return select(
            label: 'Menu:',
            options: [
                'list' => 'List your public GitHub repositories',
                'create' => 'Create a new GitHub repository',
                'exit' => 'Exit',
            ]);
    }
}
In the code above, we're first adding an argument to the handle method of the command. This command is an instance of the App\Interfaces\GitHub\GitHub interface that we created earlier. This means that when we execute the command, Laravel will automatically resolve an instance of the App\Services\GitHub\GitHubService class that we bound to the interface in the service container earlier. We're then making it a class property so that we can access it from other methods in the command.
Following this, we're using the info Prompts helper to display a simple welcome message to the user.
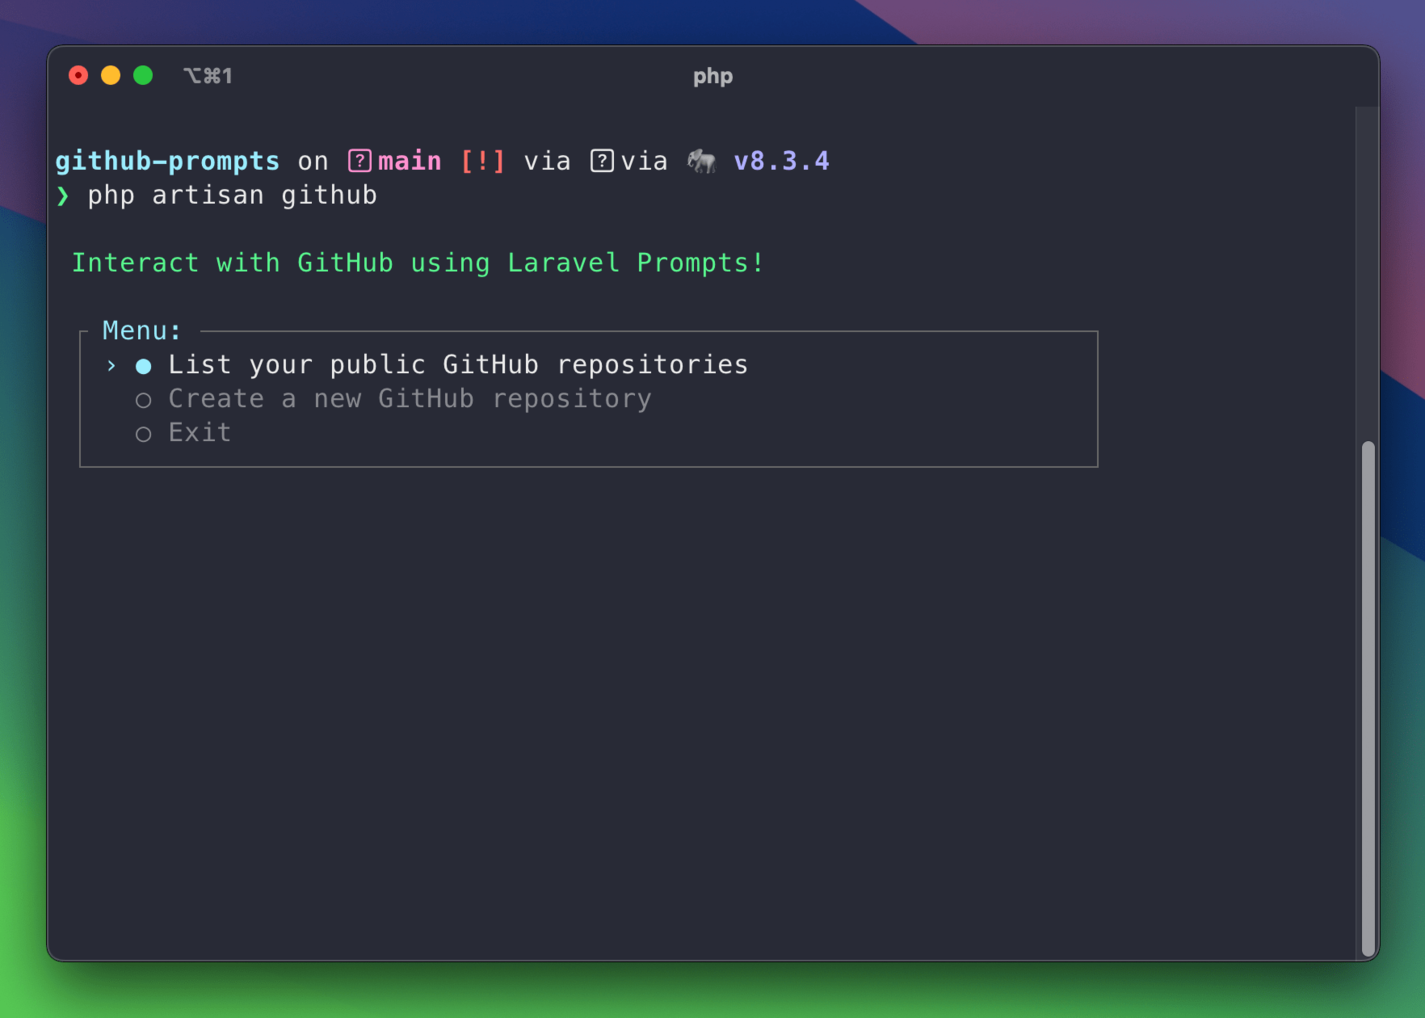
We're then using the select Prompts helper to display a menu to the user with three options: "List your public GitHub repositories," "Create a new GitHub repository," and "Exit." The result of this selection is then used in the match statement to determine which method to call next. If the user selects the list option, we'll call the listRepositories method. If they choose the create option, we'll call the createRepository method. If they pick the exit option, we'll do nothing and exit the command. We haven't created the listRepositories and createRepository methods yet—we'll do that next.
Here's what our menu looks like:
We'll now create the listRepositories method that will list the user's repositories:
declare(strict_types=1);

namespace App\Console\Commands;

use App\Collections\GitHub\RepoCollection;
use App\DataTransferObjects\GitHub\Repo;
use App\Interfaces\GitHub\GitHub;
use Illuminate\Console\Command;

use function Laravel\Prompts\info;
use function Laravel\Prompts\pause;
use function Laravel\Prompts\select;
use function Laravel\Prompts\spin;

final class GitHubCommand extends Command
{
    // ...

    private function listRepositories(): void
    {
        $repos = $this->getReposFromGitHub();

        $selectedRepoId = select(
            label: 'Select a repository:',
            options: $repos->mapWithKeys(fn (Repo $repo): array => [$repo->id => $repo->name]),
        );

        // Find the repo that we just selected.
        $selectedRepo = $repos->first(
            fn (Repo $repo): bool => $repo->id === $selectedRepoId
        );

        $this->displayRepoInformation($selectedRepo);

        $this->returnToMenu();
    }

    private function getReposFromGitHub(): RepoCollection
    {
        return once(function () {
            return spin(
                callback: fn() => $this->gitHub->listRepos(),
                message: 'Fetching your GitHub repositories...'
            );
        });
    }

    // ...
}
At the top of the listRepositories method, we're starting by calling the getReposFromGitHub method. Inside the getReposFromGitHub method, we're calling the listRepos method on the App\Services\GitHub\GitHubService class we created earlier. This will return an App\Collections\GitHub\RepoCollection containing the user's repositories for us to display.
You may have noticed we've wrapped the call to listRepos inside the spin and once helper functions.
The spin function is a Prompts helper that will display a loading spinner and a message (in this case, "Fetching your GitHub repositories...") while the request is in-flight. I love this function because it adds a bit of interactivity to the command and lets the user know that something is happening in the background. Once the request is complete, the spinner will disappear so we can display the results.
The once function isn't a Prompts helper but is a Laravel memoization function. This means the first time we call the function, we'll call the GitHub API to get the user's repositories. The result is cached until the end of the request/command lifecycle, so we'll return the same result on subsequent calls without making the call again. This is useful because we don't want to make the same API request multiple times if we don't need to.
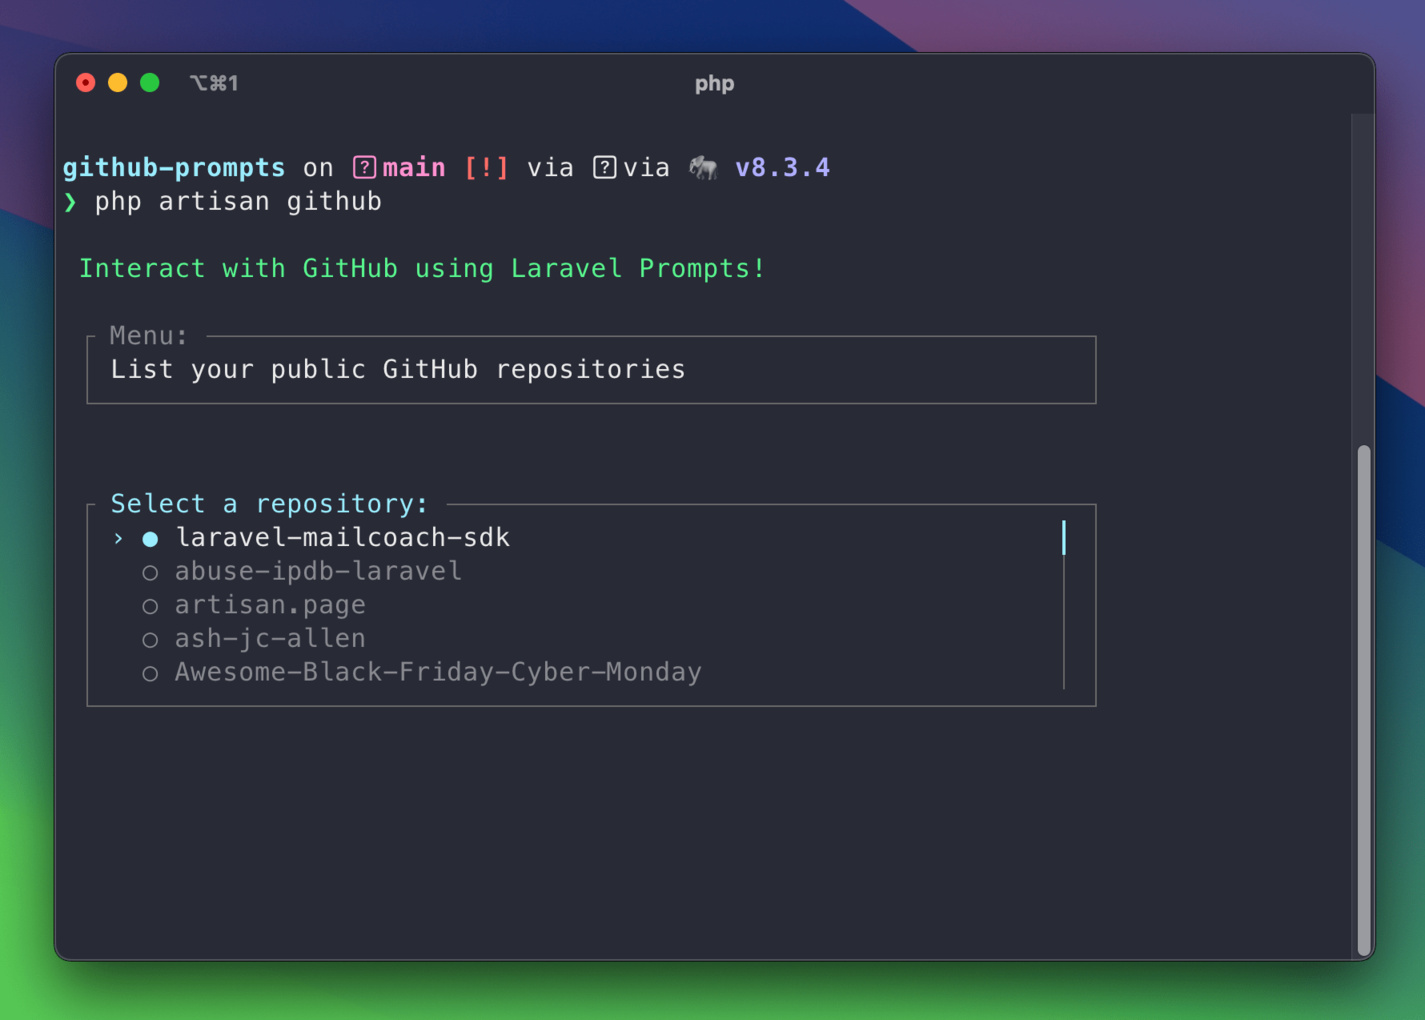
After we've fetched the repositories, we display them to the user using the select Prompts helper. Using the select helper, we can treat it like a menu so the user can select a single repository:
After they've selected a repository, we then display the repository information using the displayRepoInformation method. Finally, we call the returnToMenu method to return the user to the main menu.
The displayRepoInformation method is responsible for displaying the information about the selected repository:
declare(strict_types=1);

namespace App\Console\Commands;

use App\Collections\GitHub\RepoCollection;
use App\DataTransferObjects\GitHub\NewRepoData;
use App\DataTransferObjects\GitHub\Repo;
use App\Interfaces\GitHub\GitHub;
use Illuminate\Console\Command;

use function Laravel\Prompts\confirm;
use function Laravel\Prompts\form;
use function Laravel\Prompts\info;
use function Laravel\Prompts\pause;
use function Laravel\Prompts\select;
use function Laravel\Prompts\spin;

final class GitHubCommand extends Command
{
    // ...

    private function displayRepoInformation(Repo $repo): void
    {
        $this->components->twoColumnDetail('ID', (string) $repo->id);
        $this->components->twoColumnDetail('Owner', $repo->owner);
        $this->components->twoColumnDetail('Name', $repo->name);
        $this->components->twoColumnDetail('Description', $repo->description);
        $this->components->twoColumnDetail('Private', $repo->private ? '✅' : '❌');
        $this->components->twoColumnDetail('Created At', $repo->createdAt->format('Y-m-d H:i:s'));
    }

    private function returnToMenu(): void
    {
        pause('Press ENTER to return to menu...');

        $this->displayMenu();
    }
}
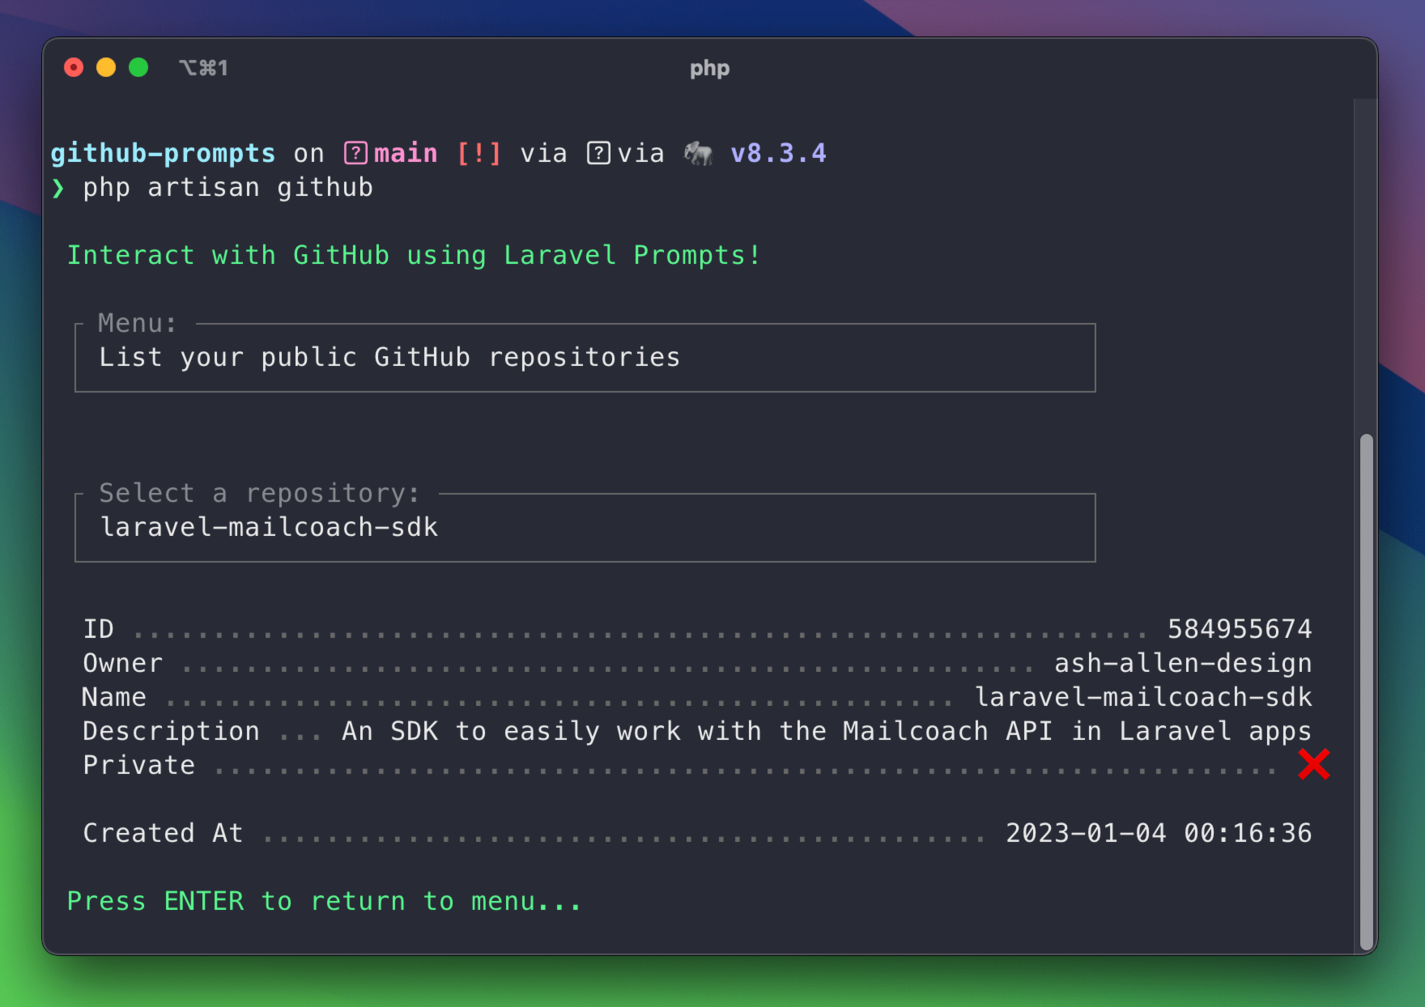
In the displayRepoInformation method above, we're using the built-in Laravel console "two-column detail" component to display a list of details about the selected repository to the user.
Then, in the returnToMenu method, we use the pause Prompts helper to display a message to the user. This will pause the execution of the command and wait for the user to press the ENTER key. Once they've pressed the key, we call the displayMenu method (that we looked at earlier) to return them to the main menu.
This will look like:
Now that we've looked at how to list the user's repositories, let's look at how to create a new repository.
As we've already seen from our main menu, the user can select the create option to create a new repository. When they do this, we'll call the createRepository method:
declare(strict_types=1);
namespace App\Console\Commands;
use App\Collections\GitHub\RepoCollection;
use App\DataTransferObjects\GitHub\NewRepoData;
use App\DataTransferObjects\GitHub\Repo;
use App\Interfaces\GitHub\GitHub;
use Illuminate\Console\Command;
use function Laravel\Prompts\confirm;
use function Laravel\Prompts\form;
use function Laravel\Prompts\info;
use function Laravel\Prompts\pause;
use function Laravel\Prompts\select;
use function Laravel\Prompts\spin;
final class GitHubCommand extends Command
{
// ...
private function createRepository(): void
{
$formData = $this->displayNewRepoForm();
if (!confirm('Are you sure you want to continue?')) {
info('Returning to menu...');
$this->displayMenu();
return;
}
// Create an instance of NewRepoData with the form data.
$repoData = new NewRepoData(
name: $formData['repo_name'],
private: $formData['is_private']
);
// Create the repository.
$repo = spin(
fn (): Repo => $this->gitHub->createRepo($repoData),
'Creating repository...',
);
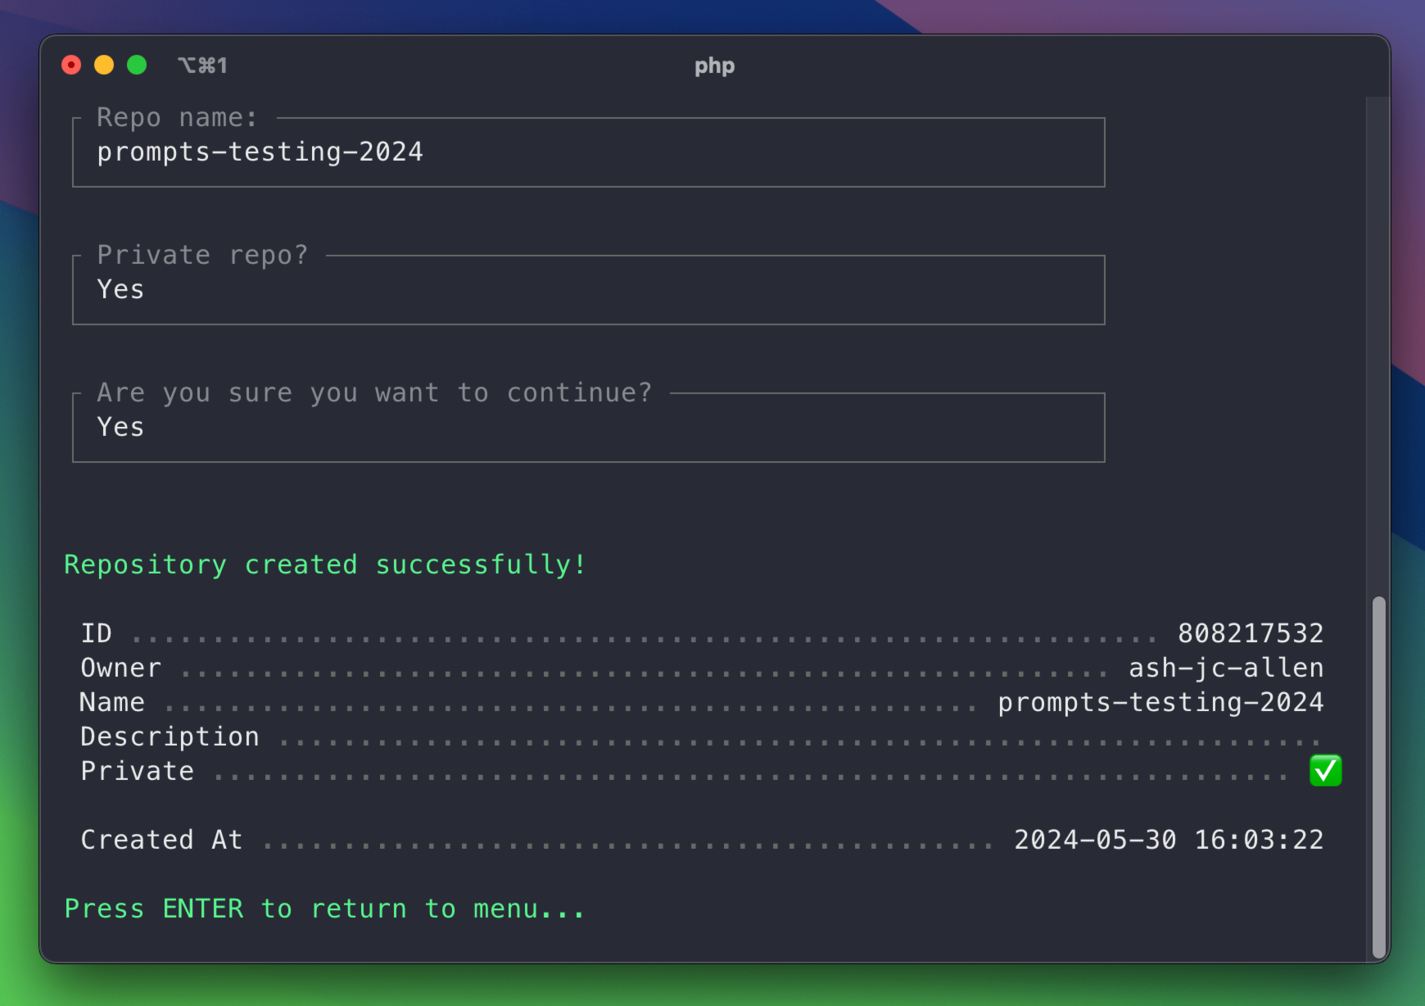
info('Repository created successfully!');
$this->displayRepoInformation($repo);
$this->returnToMenu();
}
private function displayNewRepoForm(): array
{
return form()
->text(
label: 'Repo name:',
required: true,
validate: ['max:100'],
name: 'repo_name'
)
->confirm(
label: 'Private repo?',
name: 'is_private'
)
->submit();
}
}
Let's break down what's happening here. We're first starting by calling the displayNewRepoForm method. Here, we're using the form Prompts helper to display the form to the user and gather the name and visibility of our new repository. By returning the result of the form, we then have access to the user's answers using the createRepository method.
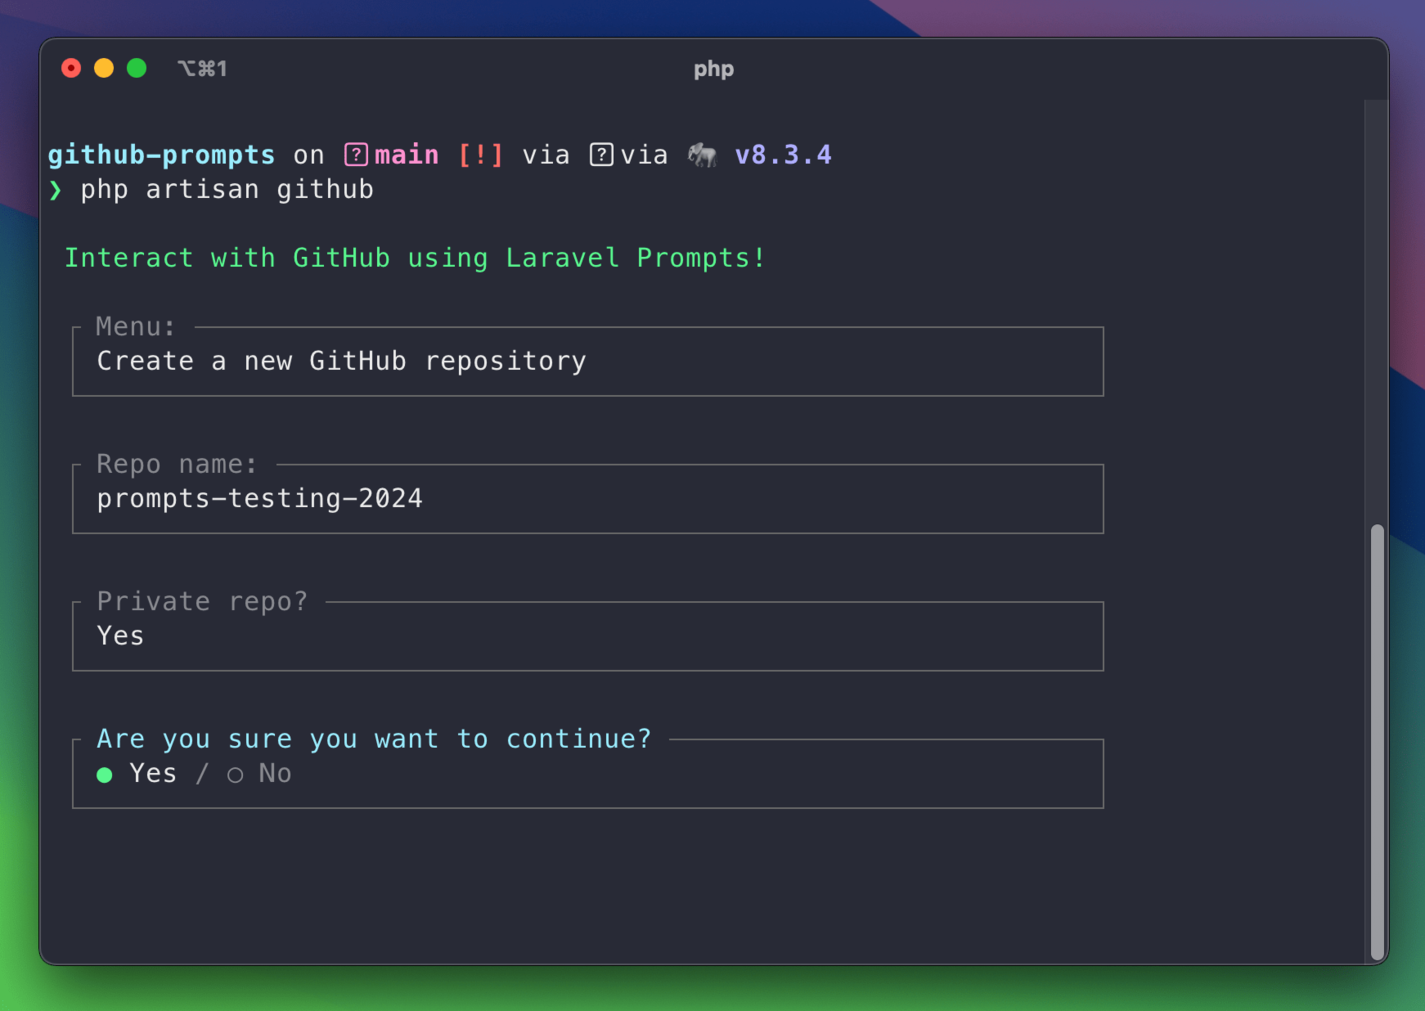
After gathering the form data, we're then using the confirm Prompts helper to ask the user if they're sure they want to continue. If they select "No," we'll display a message to the user and then return them to the main menu. If they select "Yes," we'll continue creating the repository. We're doing this to reduce the chance of the user accidentally creating a repository with incorrect information:
Once we have confirmation from the user, we create an instance of App\DataTransferObjects\GitHub\NewRepoData with the form data and pass it to the createRepo method on the App\Services\GitHub\GitHubService class. This will create a new repository on GitHub with the details we provided and return the repository data. You may have noticed that we're also using the spin Prompts helper here to display a loading spinner while the repository is being created.
After creating the repository, we display the repository information to the user using the displayRepoInformation method. Finally, we're calling the returnToMenu method to return the user to the main menu:
The completed App\Console\Commands\GitHubCommand class looks like this:
declare(strict_types=1);

namespace App\Console\Commands;

use App\Collections\GitHub\RepoCollection;
use App\DataTransferObjects\GitHub\NewRepoData;
use App\DataTransferObjects\GitHub\Repo;
use App\Interfaces\GitHub\GitHub;
use Illuminate\Console\Command;

use function Laravel\Prompts\confirm;
use function Laravel\Prompts\form;
use function Laravel\Prompts\info;
use function Laravel\Prompts\pause;
use function Laravel\Prompts\select;
use function Laravel\Prompts\spin;

final class GitHubCommand extends Command
{
    protected $signature = 'github';

    protected $description = 'Interact with GitHub using Laravel Prompts';

    private GitHub $gitHub;

    public function handle(GitHub $gitHub): int
    {
        $this->gitHub = $gitHub;

        info('Interact with GitHub using Laravel Prompts!');

        $this->displayMenu();

        return self::SUCCESS;
    }

    private function displayMenu(): void
    {
        match ($this->getMenuChoice()) {
            'list' => $this->listRepositories(),
            'create' => $this->createRepository(),
            'exit' => null,
        };
    }

    private function getMenuChoice(): string
    {
        return select(
            label: 'Menu:',
            options: [
                'list' => 'List your public GitHub repositories',
                'create' => 'Create a new GitHub repository',
                'exit' => 'Exit',
            ]);
    }

    private function listRepositories(): void
    {
        $repos = $this->getReposFromGitHub();

        $selectedRepoId = select(
            label: 'Select a repository:',
            options: $repos->mapWithKeys(fn (Repo $repo): array => [$repo->id => $repo->name]),
        );

        // Find the repo that we just selected.
        $selectedRepo = $repos->first(
            fn (Repo $repo): bool => $repo->id === $selectedRepoId
        );

        $this->displayRepoInformation($selectedRepo);

        $this->returnToMenu();
    }

    private function createRepository(): void
    {
        $formData = $this->displayNewRepoForm();

        if (!confirm('Are you sure you want to continue?')) {
            info('Returning to menu...');
            $this->displayMenu();

            return;
        }

        // Create an instance of NewRepoData with the form data.
        $repoData = new NewRepoData(
            name: $formData['repo_name'],
            private: $formData['is_private']
        );

        // Create the repository.
        $repo = spin(
            fn (): Repo => $this->gitHub->createRepo($repoData),
            'Creating repository...',
        );

        info('Repository created successfully!');

        $this->displayRepoInformation($repo);

        $this->returnToMenu();
    }

    private function displayNewRepoForm(): array
    {
        return form()
            ->text(
                label: 'Repo name:',
                required: true,
                validate: ['max:100'],
                name: 'repo_name'
            )
            ->confirm(
                label: 'Private repo?',
                name: 'is_private'
            )
            ->submit();
    }

    private function getReposFromGitHub(): RepoCollection
    {
        return once(function () {
            return spin(
                callback: fn() => $this->gitHub->listRepos(),
                message: 'Fetching your GitHub repositories...'
            );
        });
    }

    private function displayRepoInformation(Repo $repo): void
    {
        $this->components->twoColumnDetail('ID', (string) $repo->id);
        $this->components->twoColumnDetail('Owner', $repo->owner);
        $this->components->twoColumnDetail('Name', $repo->name);
        $this->components->twoColumnDetail('Description', $repo->description);
        $this->components->twoColumnDetail('Private', $repo->private ? '✅' : '❌');
        $this->components->twoColumnDetail('Created At', $repo->createdAt->format('Y-m-d H:i:s'));
    }

    private function returnToMenu(): void
    {
        pause('Press ENTER to return to menu...');

        $this->displayMenu();
    }
}
Testing the command
Now that we've created our Artisan command using Prompts, let's write some tests to ensure it works as expected.
Since we're focusing on Prompts in this article, we're not going to write any tests related to the actual API calls that are made within the App\Services\GitHub\GitHubService class. You would want to write tests for that class in a real-life project to ensure it works as expected.
Instead, we'll test the command and fake the data returned from the service class. So that we can fake the interactions between the command and the GitHub API, we're going to be creating a test double. This class acts as a stand-in for the GitHub API client. We'll then swap out the real implementation for the test double in our tests. Let's take a look at how we might do this.
We'll first create a new App\Services\GitHub\GitHubServiceFake class that implements the App\Interfaces\GitHub\GitHub interface. By implementing the interface, we must define the listRepos and createRepo methods so the command can access them:
declare(strict_types=1);

namespace App\Services\GitHub;

use App\Collections\GitHub\RepoCollection;
use App\DataTransferObjects\GitHub\NewRepoData;
use App\DataTransferObjects\GitHub\Repo;
use App\Interfaces\GitHub\GitHub;
use Carbon\CarbonImmutable;

final readonly class GitHubServiceFake implements GitHub
{
    public function listRepos(): RepoCollection
    {
        return RepoCollection::make([
            new Repo(
                id: 1,
                owner: 'ash-jc-allen',
                name: 'Hello-World',
                private: true,
                description: 'This is your first repo!',
                createdAt: CarbonImmutable::create(2024, 05, 29),
            ),
            new Repo(
                id: 2,
                owner: 'ash-jc-allen',
                name: 'Hello-World-2',
                private: false,
                description: 'This is your second repo!',
                createdAt: CarbonImmutable::create(2024, 05, 29),
            ),
        ]);
    }

    public function createRepo(NewRepoData $repoData): Repo
    {
        return new Repo(
            id: 3,
            owner: 'ash-jc-allen',
            name: $repoData->name,
            private: $repoData->private,
            description: 'New repo description',
            createdAt: now(),
        );
    }
}
In this code example above, we can see that calls to both methods will return some hardcoded data that we can test against. However, these are just simple examples. In your projects, you may want to make the results configurable so you can test different scenarios, such as handling errors.
Now that we have our test double ready, let's write two basic tests that assert:
- The user can list their repositories.
- The user can create a new repository.
We'll take a look at the test class and then discuss what's happening:
declare(strict_types=1);

namespace Tests\Feature\Commands;

use App\Interfaces\GitHub\GitHub;
use App\Services\GitHub\GitHubServiceFake;
use Laravel\Prompts\Key;
use Laravel\Prompts\Prompt;
use PHPUnit\Framework\Attributes\Test;
use Tests\TestCase;

final class GitHubCommandTest extends TestCase
{
    protected function setUp(): void
    {
        parent::setUp();

        $this->swap(
            abstract: GitHub::class,
            instance: new GitHubServiceFake(),
        );
    }

    #[Test]
    public function repositories_can_be_listed(): void
    {
        // Fake the ENTER key press so we can bypass the "pause".
        Prompt::fake([Key::ENTER]);

        $this->artisan('github')
            ->expectsOutputToContain('Interact with GitHub using Laravel Prompts!')

            // Assert the menu is displayed. We will select "list".
            ->expectsQuestion('Menu:', 'list')
            ->expectsOutputToContain('Fetching your GitHub repositories...')

            // Select the first repo and assert its details are displayed.
            ->expectsQuestion('Select a repository:', '1')
            ->expectsOutputToContain('1')
            ->expectsOutputToContain('ash-jc-allen')
            ->expectsOutputToContain('Hello-World')
            ->expectsOutputToContain('This is your first repo')
            ->expectsOutputToContain('✅')
            ->expectsOutputToContain('2024-05-29 00:00:00')
            ->expectsOutputToContain('Press ENTER to return to menu...')
            ->expectsQuestion('Menu:', 'exit')
            ->assertOk();
    }

    #[Test]
    public function repo_can_be_created(): void
    {
        // Fake the ENTER key press so we can bypass the "pause".
        Prompt::fake([Key::ENTER]);

        $this->artisan('github')
            ->expectsOutputToContain('Interact with GitHub using Laravel Prompts!')

            // Assert the menu is displayed. We will select "create".
            ->expectsQuestion('Menu:', 'create')

            // Input details for the new repo
            ->expectsQuestion('Repo name:', 'honeybadger')
            ->expectsQuestion('Private repo?', true)

            // Confirm we want to create the repo
            ->expectsQuestion('Are you sure you want to continue?', true)
            ->expectsOutputToContain('Creating repository...')
            ->expectsOutputToContain('Repository created successfully!')

            // Assert the repo details are output correctly
            ->expectsOutputToContain('3')
            ->expectsOutputToContain('ash-jc-allen')
            ->expectsOutputToContain('honeybadger')
            ->expectsOutputToContain('New repo description')
            ->expectsOutputToContain('✅')
            ->expectsQuestion('Menu:', 'exit')
            ->assertOk();
    }
}
In the setUp method, we're creating a new instance of the App\Services\GitHub\GitHubServiceFake class and instructing Laravel to use that instance whenever we try and resolve an instance of the App\Interfaces\GitHub\GitHub interface from the service container. This means that when we run our tests, we won't be making any requests to the GitHub API and instead will be using the hardcoded data that we've defined in our test double class.
In the first test (repositories_can_be_listed), we're starting by faking the ENTER key press. If we don't do this, the command will get stuck at the pause Prompt and won't be able to continue. By faking the key press, the command will continue as expected.
When running our Laravel tests, Prompts will fall back to using the Symfony implementations you typically use in your Artisan commands. This means we can use all the usual testing methods in our console tests, such as expectsOutputToContain and expectsQuestion.
We're then executing the command by using $this->artisan('github'). This will run the command to interact with it and assert the output. By using the expectsOutputToContain method, we can assert that the output contains the expected text. We're then using the expectsQuestion method to simulate the user's input. The first argument passed to this method is the question being asked, and the second argument is the answer we'd like to provide. We're then checking that the repository (that we hardcoded in the App\Services\GitHub\GitHubServiceFake class) is displayed correctly.
Similarly, in the second test (repo_can_be_created), we're doing the same thing but creating a new repository this time. Since we're using the App\Services\GitHub\GitHubServiceFake class, we won't be making any requests to the GitHub API, and instead, we'll be returning some hardcoded data. We're then asserting that the repository is displayed correctly.
Conclusion
In this article, we looked at Laravel Prompts and some of its features that you can use. We then built a simple GitHub CLI client using Prompts to demonstrate how to use it in your applications. Finally, we learned how to write tests for your Prompts commands.
Hopefully, you now feel confident enough to build your terminal applications with Laravel Prompts!


