Have you ever been on Facebook and received a notification without having to refresh the page? This kind of real-time functionality is achieved on most applications using JavaScript frameworks, such as React via state management. Most of these applications function as single-page applications, as they do not require page reloading during use to update data in real time. For a long time, Rails applications have been stateless in the sense that a page reload is usually required to get the current state of the application. For example, if you were on a Rails app that showed a list of movies available in the theater and a movie is added by an admin, the newly added movie would not show up on your dashboard unless you refreshed the page.
Why ActionCable?
ActionCable bridges this gap and makes it possible to have real-time updates and this dynamic functionality in a Rails application. It makes use of a communication protocol called WebSocket to introduce state into the application while still being performant and scalable. With it, users can get updated content on their dashboards without having to refresh their pages.
The Magic Of Turbo-Rails
TurboRails consists of turbo drive, turbo frames, and turbo streams. When a request is sent from a part of a page wrapped in a turbo-frame, the HTML response replaces the frame it emanated from if they possess the same id. Turbo streams, on the other hand, enable these partial page updates over a web socket connection. ActionCable broadcasts these updates from a channel, and Turbo stream creates the subscriber to this channel and delivers the updates. As a result, asynchronous updates can be created directly in response to model changes.
What we Intend to Build
The intention of this article is to showcase how Turbo works with ActionCable behind the scenes to broadcast and display real-time updates in a Rails 6 App. Thus, we will be building a chat app in which a chat room can be created by any user, and all users can send messages to that room and receive updates in real time. We will also enable users to chat privately with one another. We will not be implementing group chat invites; these are beyond the scope of this blog post since it only involves additional database designs rather than Turbo and ActionCable. However, after this lesson, it should be a piece of cake if you choose to go further.
How should this look, or what should it entail?
- An index page that lists all existing chat rooms and users.
- This page should be dynamically updated when new users sign up or new rooms are created.
- A form present to create new chat rooms.
- A message chat box to create messages when in any chat room.
7 Easy Steps to Get Started
In this app, we require users to only login using their unique usernames, which is achieved using sessions.
1. Create a new rails app
rails new chatapp
cd chatapp
2. Create a user model and migrate it
rails g model User username
rails db:migrate
Then, we add a unique validation for the username since we want all usernames to be unique to their owners. We also create a scope to fetch all users except the current user for our user list, as we do not want a user chatting with himself :).
#app/models/user.rb
class User < ApplicationRecord
  validates_uniqueness_of :username
  scope :all_except, ->(user) { where.not(id: user) }
end
3. Create a chat room model
A chat room has a name and can be a private chat room (for private chats between two users) or public(available to everyone). To indicate this, we add an is_private column to our room table.
rails g model Room name:string is_private:boolean
Before we migrate this file, we’ll add a default value to the is_private column so that all rooms created are public by default, except when stated otherwise.
class CreateRooms < ActiveRecord::Migration[6.1]
  def change
    create_table :rooms do |t|
    t.string :name
    t.boolean :is_private, :default => false

    t.timestamps

    end
  end
end
After this step, we migrate our file using the command rails db:migrate. It's also necessary to add uniqueness validation for the name property and a scope to fetch all public rooms for our room list.
#app/models/room.rb
class Room < ApplicationRecord
  validates_uniqueness_of :name
  scope :public_rooms, -> { where(is_private: false) }
end
4. Add Styling
To add minimal styling to this app, we’ll add the bootstrap CDN to our application.html.erb file
<link rel="stylesheet" href="https://stackpath.bootstrapcdn.com/bootstrap/4.3.1/css/bootstrap.min.css" integrity="sha384-ggOyR0iXCbMQv3Xipma34MD+dH/1fQ784/j6cY/iJTQUOhcWr7x9JvoRxT2MZw1T" crossorigin="anonymous">
5. Add Authentication
Adding authentication to the app will require a current_user variable at all times. Let's add the following code in the stated files to your app to enable auth.
#app/controllers/application_controller.rb
helper_method :current_user

def current_user
  if session[:user_id]
    @current_user  = User.find(session[:user_id])
  end
end

def log_in(user)
  session[:user_id] = user.id
  @current_user = user
  redirect_to root_path
end

def logged_in?
  !current_user.nil?
end

def log_out
  session.delete(:user_id)
  @current_user = nil
end
#app/controllers/sessions_controller.rb
class SessionsController < ApplicationController

  def create
    user = User.find_by(username: params[:session][:username])
    if user
      log_in(user)
    else
      render 'new'
    end
  end

  def destroy
    log_out if logged_in?
    redirect_to root_path
  end

end
#app/views/sessions/new.html.erb
<%= form_for (:session) do |f| %>
  <%= f.label :username, 'Enter your username' %>
  <%= f.text_field :username, autocomplete: 'off' %>
  <%= f.submit 'Sign in' %>
<% end %>
Add the following routes to the routes.rb file.
#routes.rb
Rails.application.routes.draw do
  get '/signin', to: 'sessions#new'
  post '/signin', to: 'sessions#create'
  delete '/signout', to: 'sessions#destroy'
end
6. Create the Controller
Create the RoomsController using rails g controller Rooms index and add the variables for the list of users and rooms to our index method.
class RoomsController < ApplicationController

  def index
    @current_user = current_user
    redirect_to '/signin' unless @current_user
    @rooms = Room.public_rooms
    @users = User.all_except(@current_user)
  end
end
7. Set Up Routes
Add the room, user and root routes to routes.rb so that our landing page is the index page that lists all rooms and users, and we can navigate to any room of choice.
#routes.rb
  resources :rooms
  resources :users
  root 'rooms#index'
Setting up the views
Our first introduction to the 'magic' of Turbo is the reception of real-time updates on our dashboard in the event of newly added rooms or newly signed-up users.
To achieve this, first of all, we create two partials: _room.html.erb to display each room and _user.html.erb to display each user. We will render this list in the index.html.erb file that was created when the RoomsController was created, as this is our landing page.
# app/views/rooms/_room.html.erb
<div> <%= link_to room.name, room %> </div>
# app/views/users/_user.html.erb
<div> <%= link_to user.username, user %> </div>
We proceed to render these files in our index.html.erb file, not by referencing them directly but by rendering the variables that fetch the collection. Recall that in our RoomsController, the variables @users and @rooms have already been defined.
#app/views/rooms/index.html.erb
<div class="container">
  <h5> Hi <%= @current_user.username %> </h5>
  <h4> Users </h4>
  <%= render @users %>
  <h4> Rooms </h4>
  <%= render @rooms %>
</div>
In the console, run the following commands:
Room.create(name: 'music')
User.create(username: 'Drake')
User.create(username: 'Elon')
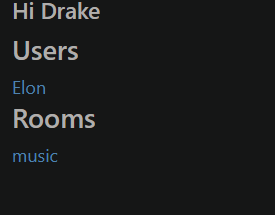
Turn on your Rails server using rails s. You will be prompted to sign in; do so with the username of any of the users created above, and you should have your newly created room and the user you didn't sign in as show up as shown in the image below.
Introducing Turbo
To achieve real-time updates, we need to have Turbo installed. It is important to note that this gem is automatically configured for applications made with Rails 7+.
bundle add turbo-rails
rails turbo:install
Run the following commands to get Redis up and running:
sudo apt install redis-server
# installs redis if you don't have it yet
rails turbo:install:redis
# changes the development Action Cable adapter from Async (the default one) to Redis
redis-server
# starts the server
Import turbo-rails into the application.js file using import "@hotwired/turbo-rails"
Next, we'll add specific instructions to our models and ask them to broadcast any newly added instance to a particular channel. This broadcast is done by ActionCable, as we will see shortly.
#app/models/user.rb
class User < ApplicationRecord
  validates_uniqueness_of :username
  scope :all_except, ->(user) { where.not(id: user) }
  after_create_commit { broadcast_append_to "users" }
end
Here, we are asking the user model to broadcast to a channel called "users" after every new instance of a user is created.
#app/models/room.rb
class Room < ApplicationRecord
  validates_uniqueness_of :name
  scope :public_rooms, -> { where(is_private: false) }
  after_create_commit {broadcast_append_to "rooms"}
end
Here, we are also asking the room model to broadcast to a channel called "rooms" after each new instance of room is created.
Start up your console if it is not started already, or use the reload! command if it's already up and running. After creating a new instance of any of these, we see that ActionCable broadcasts the added instance to the specified channel as a turbo stream by using the partial assigned to it as a template. For a newly added room, it broadcasts the partial _room.html.erb with values corresponding to the newly added instance, as shown below.

The problem, though, is that the broadcasted template does not show up on the dashboard. This is because we need to add a receiver of the broadcast to our view so that whatever is broadcasted by ActionCable can be received and appended. We do this by adding a turbo_stream_from tag, specifying the channel we hope to receive the broadcast from. As seen in the image above, the broadcasted stream has a target attribute, and this specifies the id of the container to which the stream would be appended. This means that the broadcasted template will search for a container with an id of "rooms" to be appended to; hence, we include a div with the said id to our index file.
To achieve this, in our index.html.erb file, we replace the <%= render @users %> with:
<%= turbo_stream_from "users" %>
<div id="users">
  <%= render @users %>
</div>
and the <%= render @rooms %> with
<%= turbo_stream_from "rooms" %>
<div id="rooms">
  <%= render @rooms %>
</div>
At this moment, we can experience the magic of Turbo. We can refresh our page and begin to add new users and rooms from our console and watch them be appended to our page in real time. Yippee!!!
Tired of creating new rooms from the console? Let's add a form that enables users to create new rooms.
#app/views/layouts/_new_room_form.html.erb
<%= form_with(model: @room, remote: true, class: "d-flex" ) do |f| %>
  <%= f.text_field :name, class: "form-control", autocomplete: 'off' %>
  <%= f.submit data: { disable_with: false } %>
<% end %>
In the above form, @room is used, but it has not been defined yet in our controller; thus, we define it and add it to the index method of our RoomsController.
@room = Room.new
When the create button is clicked, it will route to a create method in the RoomsController, which does not exist at the moment; hence, we need to add it.
#app/controllers/rooms_controller.rb
def create
  @room = Room.create(name: params["room"]["name"])
end
We can add this form to our index file by rendering its partial as such:
<%= render partial: "layouts/new_room_form" %>
Also, we can add some bootstrap classes to divide the page into a part for the list of rooms and users and the other for chat.
<div class="row">
  <div class="col-md-2">
    <h5> Hi <%= @current_user.username %> </h5>
    <h4> Users </h4>
    <div>
      <%= turbo_stream_from "users" %>
      <div id="users">
        <%= render @users %>
      </div>
    </div>
    <h4> Rooms </h4>
    <%= render partial: "layouts/new_room_form" %>
    <div>
      <%= turbo_stream_from "rooms" %>
      <div id="rooms">
        <%= render @rooms %>
      </div>
    </div>
  </div>
  <div class="col-md-10 bg-dark">
    The chat box stays here
  </div>
</div>
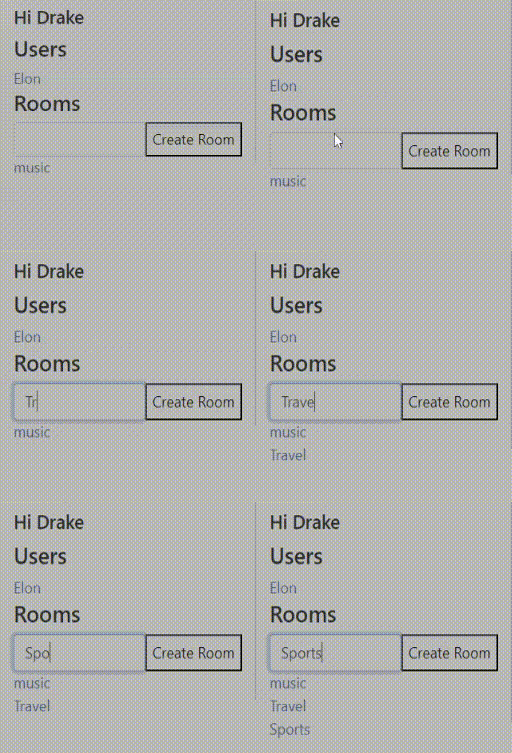 Image of added rooms updated in real-time
Now, upon creating new rooms, we can see that these rooms are created, and the page is updated in real-time. You probably have also noticed that the form does not get cleared after each submission; we'll handle this issue later using stimulus.
Group Chats
For group chats, we need to be able to route to individual rooms but remain on the same page. We do this by adding all the index page-required variables to our RoomsController show method and rendering the index page still.
#app/controllers/rooms_controller.rb
def show
  @current_user = current_user
  @single_room = Room.find(params[:id])
  @rooms = Room.public_rooms
  @users = User.all_except(@current_user)
  @room = Room.new

  render "index"
end
An extra variable named @single_room has been added to the show method. This gives us the particular room being routed to; hence, we can add a conditional statement to our index page that shows the name of the room we have navigated to when a room name is clicked. This is added within the div with the class name col-md-10, as shown below.
<div class="col-md-10 bg-dark text-light">
  <% if @single_room %>
    <h4 class="text-center"> <%= @single_room.name %> </h4>
  <% end %>
</div>
 Image showing moving into several rooms
Now we'll move on to some more juicy stuff, messaging. We have to give our chat section a height of 100vh so that it fills the page and include a chat box in it for message creation. The chatbox will require a message model. This model will have a user reference and a room reference, as a message can't exist without a creator and the room for which it was meant.
rails g model Message user:references room:references content:text
rails db:migrate
We also need to identify this association in the user and room models by adding the following line to them.
has_many :messages
Let's add a form to our page for message creation and add styling to it:
#app/views/layouts/_new_message_form.html.erb
<div class="form-group msg-form">
  <%= form_with(model: [@single_room ,@message], remote: true, class: "d-flex" ) do |f| %>
    <%= f.text_field :content, id: 'chat-text', class: "form-control msg-content", autocomplete: 'off' %>
    <%= f.submit data: { disable_with: false }, class: "btn btn-primary" %>
  <% end %>
</div>
#app/assets/stylesheets/rooms.scss
  .msg-form {
    position: fixed;
    bottom: 0;
    width: 90%
  }

  .col-md-10 {
    height: 100vh;
    overflow: scroll;
  }

  .msg-content {
    width: 80%;
    margin-right: 5px;
  }
This form includes an @message variable; hence, we need to define it in our controller. We add this to the show method of our RoomsController.
@message = Message.new
In our routes.rb file, we add the message resource within the room resource, as this attaches to the params, the id of the room the message is being created from.
resources :rooms do
  resources :messages
end
Whenever a new message is created, we want it broadcasted to the room in which it was created. To do this, we need a message partial that renders the message. As this is what will be broadcasted, we also need a turbo_stream that receives the broadcasted message for that particular room and a div that will serve as the container for the appending of these messages. Let's not forget that the id of this container must be same as the target of the broadcast.
We add this to our message model:
#app/models/message.rb
after_create_commit { broadcast_append_to self.room }
This way, it broadcasts to the particular room in which it was created.
We also add the stream, message container, and message form to our index file:
#within the @single_room condition in app/views/rooms/index.html.erb
<%= turbo_stream_from @single_room %>
<div id="messages">
</div>
<%= render partial: 'layouts/new_message_form' >
We create the message partial that will be broadcasted, and in it, we show the username of the sender only if the room is a public one.
#app/views/messages/_message.html.erb
<div>
  <% unless message.room.is_private %>
    <h6 class="name"> <%= message.user.username %> </h6>
  <% end %>
  <%= message.content %>
</div>
From the console, if we create a message, we can see that it is broadcasted to its room using the assigned template.

To enable message creation from the dashboard, we need to add the create method to the MessagesController.
#app/controllers/messages_controller.rb
class MessagesController < ApplicationController
  def create
    @current_user = current_user
    @message = @current_user.messages.create(content: msg_params[:content], room_id: params[:room_id])
  end

  private

  def msg_params
    params.require(:message).permit(:content)
  end
end
This is what we get:
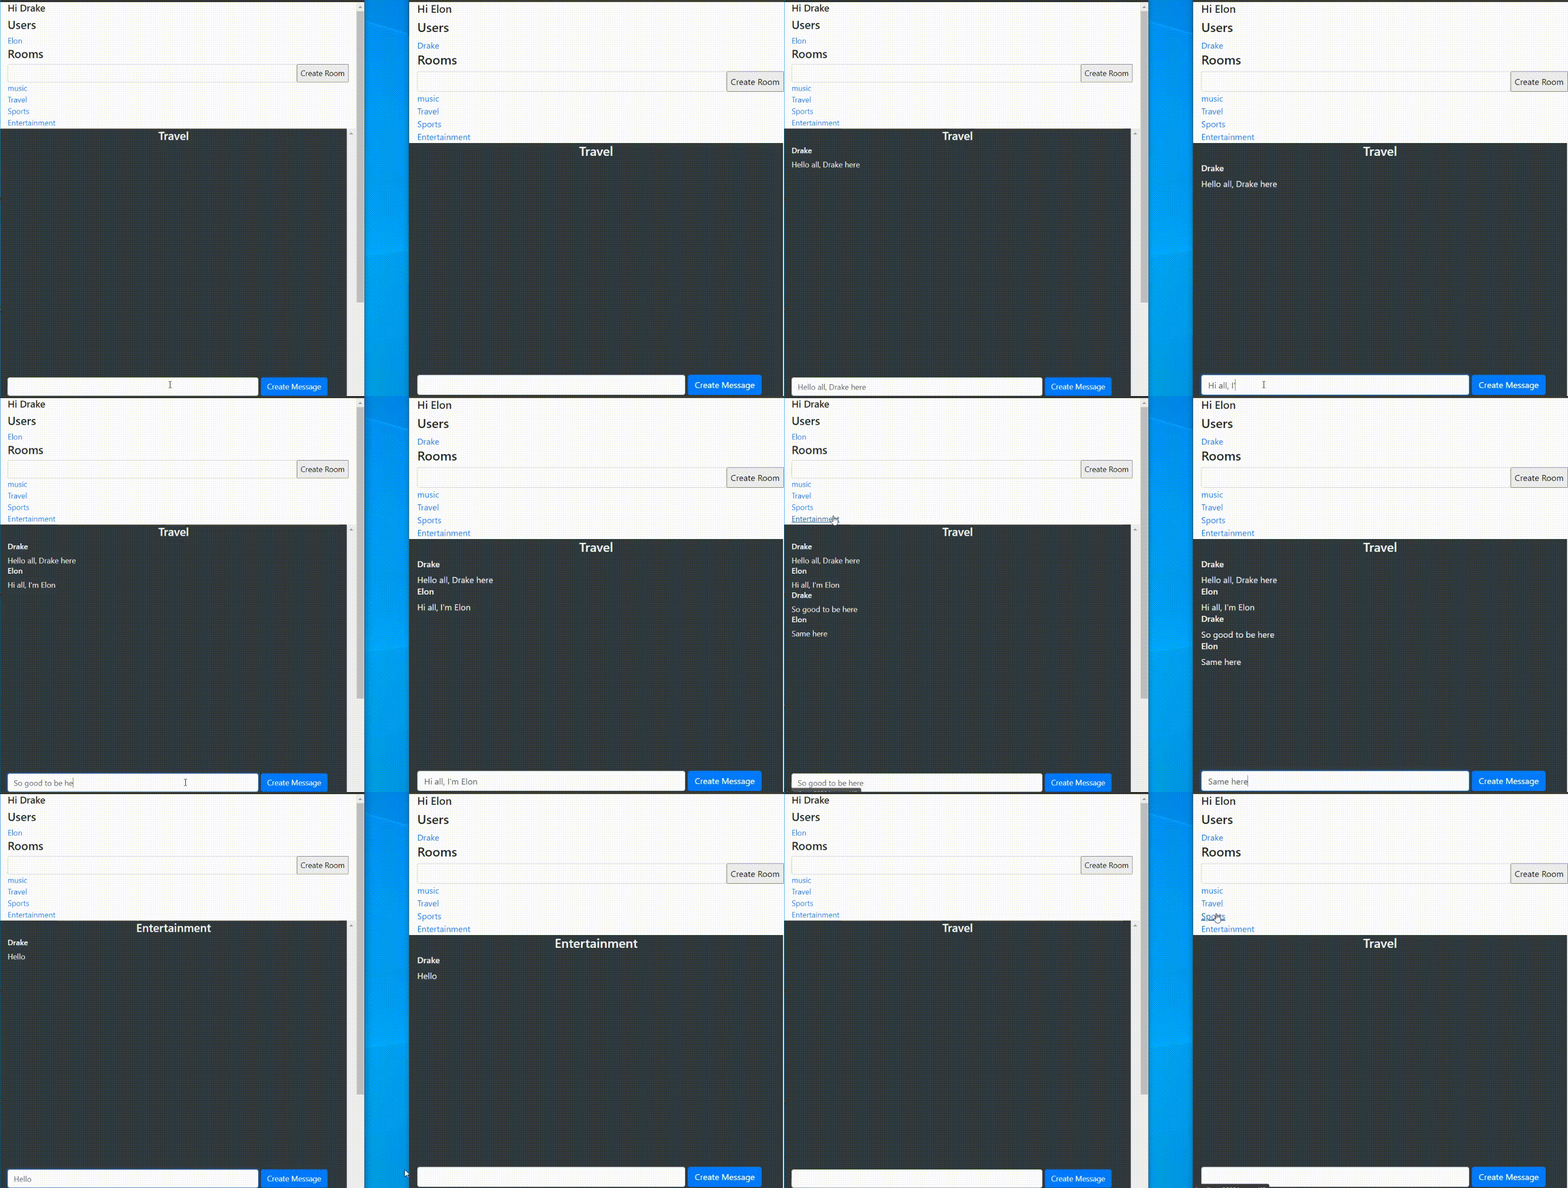
As we can see in the video above, the messages are appended, but if we move to another chat room, it looks like we lose the messages in the previous one when we return. This is because we are not fetching the messages that belong to a room for display. To do this, in the RoomsController show method, we add a variable that fetches all messages belonging to a room, and on the index page, we render the fetched messages. We can also see that the message form does not get cleared after a message is sent; this would be handled with Stimulus down the line.
#in the show method of app/controllers/rooms_controller.rb
@messages = @single_room.messages
#within the div with id of 'messages'
  <%= render @messages %>
Now, each room will have its messages loaded on entrance.
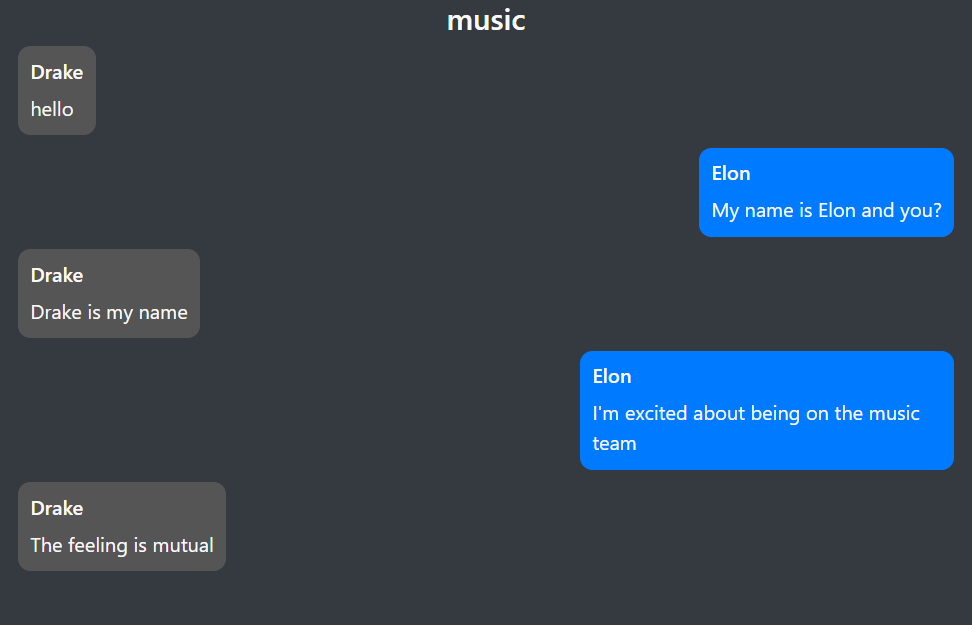
We need to make this look more presentable by aligning the current user's messages to the right and the others to the left. The most straightforward way to achieve this would be to assign classes based on the condition message.user == current_user, but local variables are not available to streams; hence, for a broadcasted message, there would be no current_user.
What can we do? We can assign a class to the message container based on the message sender id and then take advantage of the current_user helper method to add a style to our application.html.erb file. This way, if the current user's id is 2, the class in the style tag in application.html.erb will be .msg-2, which will also correspond to the class in our message partial when the message sender is the current user.
#app/views/messages/_message.html.erb
<div class="cont-<%= message.user.id %>">
  <div class="message-box msg-<%= message.user.id %> " >
    <% unless message.room.is_private %>
      <h6 class="name"> <%= message.user.username %> </h6>
    <% end %>
  <%= message.content %>
  </div>
</div>
We add message-box styling:
#app/assets/stylesheets/rooms.scss
.message-box {
  width: fit-content;
  max-width: 40%;
  padding: 5px;
  border-radius: 10px;
  margin-bottom: 10px;
  background-color: #555555 ;
  padding: 10px
}
In the head tag of our application.html.erb file.
#app/views/layouts/application.html.erb
<style>
  <%= ".msg-#{current_user&.id}" %> {
  background-color: #007bff !important;
  padding: 10px;
  }
  <%= ".cont-#{current_user&.id}" %> {
  display: flex;
  justify-content: flex-end
  }
</style>
We add the !important tag to the background-color because we want the background color to be overridden for the current user.
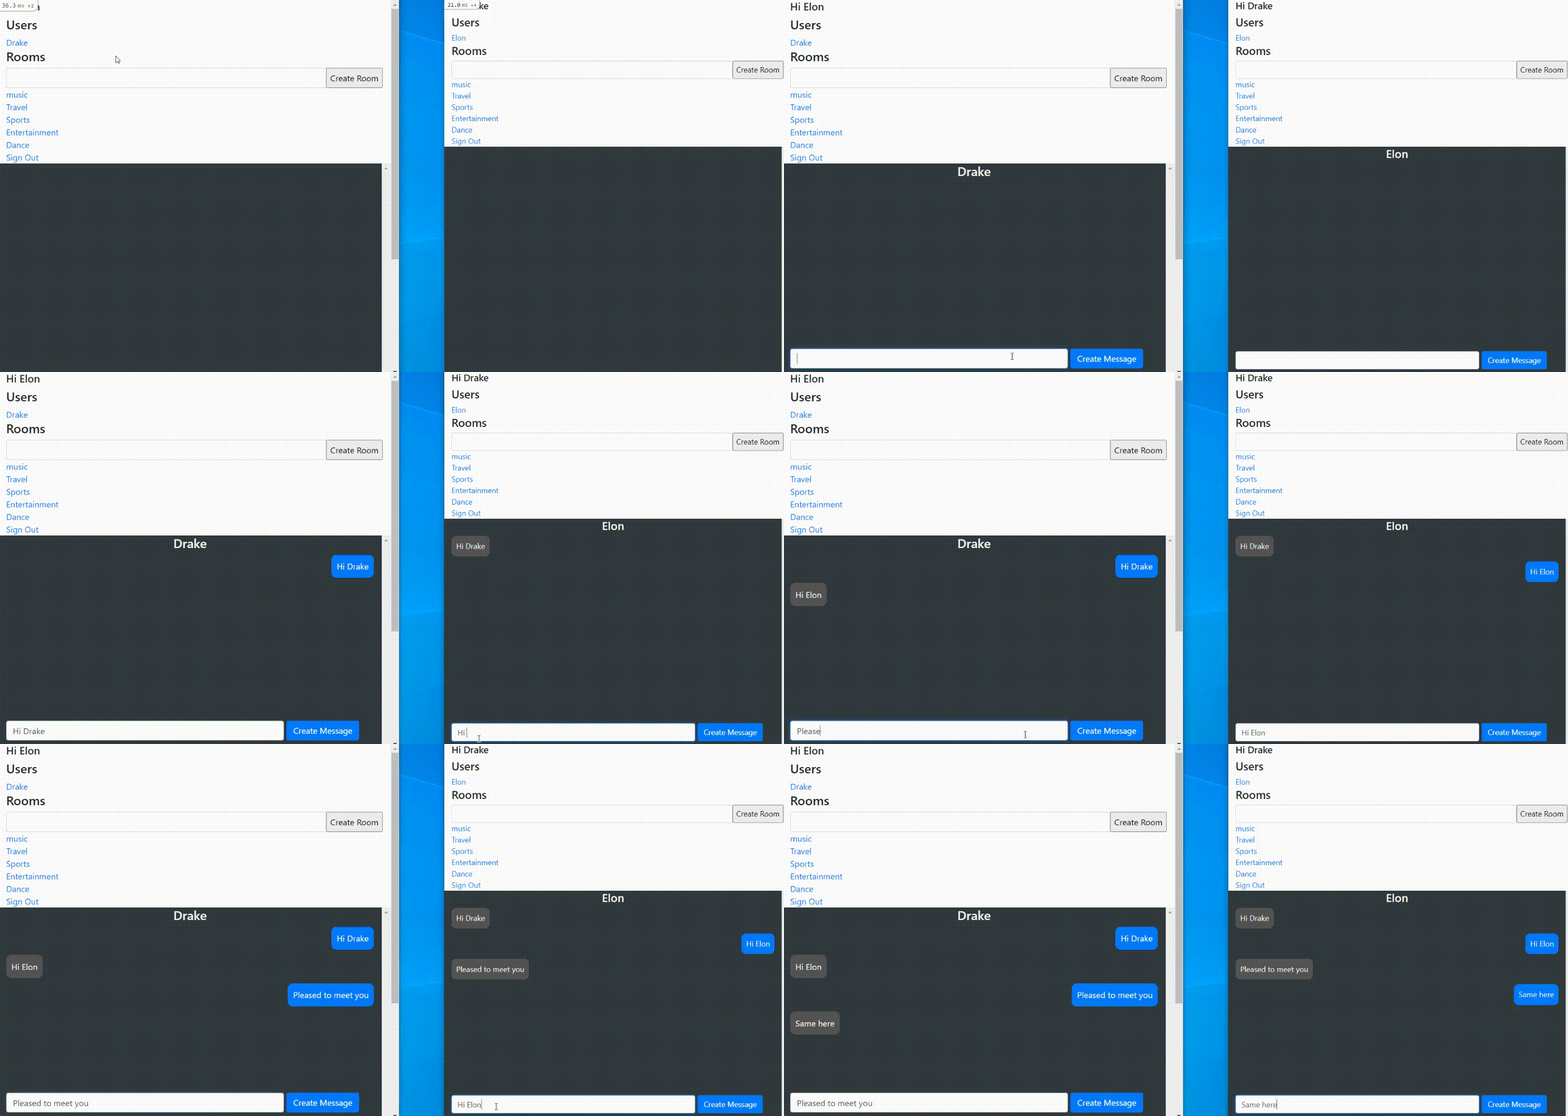
Our chats then look like this:
Private Chat
Most of the work needed for private chats was done during the group chat setup. All we need to do now is the following:
- Create a private room for a private chat when routing to a particular user if such a room is non-existent.
- Create participants for such rooms so that an intruder cannot send messages to such rooms, even from the console.
- Prevent newly created private rooms from being broadcasted to the room list.
- Display a user's name instead of a room's name when it's a private chat.
In routing to a particular user, the current user is indicating that they want to privately chat with that user. Hence, in our UsersController, we check whether such a private room exists between these two. If it does, it becomes our @single_room variable; otherwise, we will create it. We will create a special room name for each private chat room so that we can reference it when needed. We also need to include all the variables needed by the index page in the show method to remain on the same page.
#app/controllers/users_controller.rb
class UsersController < ApplicationController
  def show
    @user = User.find(params[:id])
    @current_user = current_user
    @rooms = Room.public_rooms
    @users = User.all_except(@current_user)
    @room = Room.new
    @message = Message.new
    @room_name = get_name(@user, @current_user)
    @single_room = Room.where(name: @room_name).first || Room.create_private_room([@user, @current_user], @room_name)
    @messages = @single_room.messages

    render "rooms/index"
  end

  private
  def get_name(user1, user2)
    users = [user1, user2].sort
    "private_#{users[0].id}_#{users[1].id}"
  end
end
As we can see above, we need to add a create_private_room method to our Room model, which will create a private room and its participants. This leads us to create a new model called Participant, which will indicate a user and the private room to which he or she belongs.
rails g model Participant user:references room:references
rails db:migrate
In our room model, we add the create_private_room method and change our after_create call to only broadcast the room name if it's not a private room.
#app/models/room.rb
has_many :participants, dependent: :destroy
after_create_commit { broadcast_if_public }

def broadcast_if_public
  broadcast_append_to "rooms" unless self.is_private
end

def self.create_private_room(users, room_name)
  single_room = Room.create(name: room_name, is_private: true)
  users.each do |user|
    Participant.create(user_id: user.id, room_id: single_room.id )
  end
  single_room
end
To prevent other users from sending messages to a private room when they are not participants, we add a before_create check to the Message model. Thus, for private rooms, a confirmation is made that the sender of the message is indeed a participant of that private conversation before such a message is created. We should note that from the dashboard, it is impossible to send a message to a private room if you're not a participant since you only need to click on the username and then the room is created for both users. This check is just for extra security, as a message can be created by a non-participant from the console.
#app/models/message.rb
before_create :confirm_participant

def confirm_participant
  if self.room.is_private
    is_participant = Participant.where(user_id: self.user.id, room_id: self.room.id).first
    throw :abort unless is_participant
  end
end
To display a user's username instead of a room's name during a private chat, we indicate on our index page that if the @user variable is present, the user's username should be shown. Note that this variable is only present in the UsersController show method. This leads to the h4 tag showing the room name changing to this:
<h4 class="text-center"> <%= @user&.username || @single_room.name %> </h4>
Now, when we navigate to a user, we see the user's username rather than the room's name, and we can send and receive messages. Let's not forget to add a sign-out link to our home page.
<%= link_to 'Sign Out', signout_path, :method => :delete %>
As you can see below, for private chats, the username of the sender is not shown. We are able to identify our own messages by their position.
Stimulus
We will be using stimulus to clear the forms since a full-page re-render does not happen, and the forms are not cleared on a new model instance creation.
bundle add stimulus-rails
rails stimulus:install
This adds the following files, as seen in the image below.

We create a reset_form_controller.js file to reset our forms and add the following function to it.
//app/javascript/controllers/reset_form_controller.js
import { Controller } from "stimulus"

export default class extends Controller {
  reset() {
    this.element.reset()
  }
}
Then, we add a data attribute to our forms, indicating the controller and the action.
data: { controller: "reset-form", action: "turbo:submit-end->reset-form#reset" }
For example, the form_with tag of our message form changes to the following:
<%= form_with(model: [@single_room ,@message], remote: true, class: "d-flex",
     data: { controller: "reset-form", action: "turbo:submit-end->reset-form#reset" }) do |f| %>
Finally, this is all that's needed; our forms clear out after the creation of a new message or room. We should also note that the stimulus action "ajax:success->reset-form#reset" can also clear a form when an ajax:success event occurs.
Conclusion
In this app, we have focused on the appending action of Turbo Streams, but this is not all that Turbo Streams entails. In fact, Turbo Streams consists of five actions: append, prepend, replace, update, and remove. To implement the deleting and updating of chat messages in real time, these actions will come in handy, and some knowledge of Turbo frames and how they work might be required. It is also important to note that for applications that depend on WebSocket updates for certain features, on poor connections, or if there are server issues, your WebSocket may get disconnected. It is therefore advisable to use Turbo Streams in your apps only when it's extremely important.


