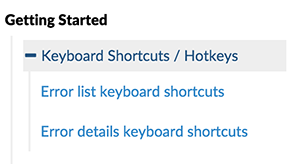
I've been rebuilding our documentation site using Jekyll. Since our documentation pages are pretty big, we have to have some kind of subnavigation in addition to the top-level navigation.
In this post we'll cover how to make a simple Jekyll plug-in that can generate subnav links from the headings in your posts or pages.
Overview
I've broken this project down into the following tasks:
- Create a Jekyll generator which is run against every page on the site.
- Teach the generator how to pre-render the pages so that it can extract heading information.
- Use nokogiri to parse the pages HTML extract the relevant headings and content.
- Render the subnavigation.
In the examples below all of the subnav links are anchor links. For this approach to work, you'll need to make sure your markdown processor creates IDs for headings. RedCarpet with the with_toc_data option works nicely.
A basic Jekyll Generator
there are a couple of different types of plug-ins that you can create for Jekyll. We're going to be creating a generator.
Generators are simply classes that inherit from Jekyll::Generator and which provide a method called generate.
Generators are run after Jekyll loads all of the markdown files but before those files are converted to HTML. A site object is passed into the generate method. And you can use the site object to access all of your sites pages, posts and other resources.
In the example below, we create a generator that loops through all pages and prints out their titles.
class MySubnavGenerator < Jekyll::Generator
  def generate(site)
    site.pages.each do |page|
      puts page.data["title"]
    end
  end
end
We can also modify page and site data inside the generator -- data loaded from front-matter and from the site configuration file.
   page.data["title"] += " - modified!"
   site.data["tagline"]
Pre-Rendering Markdown to HTML
We want to extract headings from our markdown documents. The simplest way to do this is to convert the markdown to HTML then parse the HTML using a tool like nokogiri.
Does this make me feel a little bit dirty? Yep. Will it be kinda slow? Absolutely. But since Jekyll is a static site generator, I don't have to worry about real-time performance. So I'm just going to hold my nose and get it done.
Here, we use Jekyll's built in markdown wrapper to convert every markdown page to HTML.
class MySubnavGenerator < Jekyll::Generator
  def generate(site)
    parser = Jekyll::Converters::Markdown.new(site.config)

    site.pages.each do |page|
      if page.ext == ".md"
        html = parser.convert(page['content'])
        # Do something with the html here
      end
    end
  end
end
Extracting Headings
For our new documentation site, I decided that every H2 tag should have a corresponding subnavigation link. So I will use nokogiri to parse each page's HTML, then I will pluck out each H2 tag from the page.
For now, we'll just print the H2's content and ID to screen:
require "nokogiri"

class MySubnavGenerator < Jekyll::Generator
  def generate(site)
    parser = Jekyll::Converters::Markdown.new(site.config)

    site.pages.each do |page|
      if page.ext == ".md"
        doc = Nokogiri::HTML(parser.convert(page['content']))
        doc.css('h2').each do |heading|
          puts "#{ heading.text }: #{ heading['id'] }"
        end
      end
    end
  end
end
Creating the Subnavigation menu
Now that we have the headings text and ID we can create a list of subnavigation links.
We will store this list of links as a data attribute of the page itself. That way, we can access the links from our page template.
require "nokogiri"

class MySubnavGenerator < Jekyll::Generator
  def generate(site)
    parser = Jekyll::Converters::Markdown.new(site.config)

    site.pages.each do |page|
      if page.ext == ".md"
        doc = Nokogiri::HTML(parser.convert(page['content']))
        page.data["subnav"] = []
        doc.css('h2').each do |heading|
          page.data["subnav"] << { "title" => heading.text, "url" => [page.url, heading['id']].join("#") }
        end
      end
    end
  end
end
Now, in your template, you can loop through the subnav and display each link:
{% for item in page.subnav %}
  <a href="{{ item.url }}">{{ item.title }}</a>
{% endfor %}
Troubleshooting
Like I mentioned before, this is all dependent on your markdown processor creating unique IDs for each heading. Here are my markdown settings from _config.yml:
# Use the redcarpet Markdown renderer
markdown: redcarpet
redcarpet:
    extensions: [
        'no_intra_emphasis',
        'fenced_code_blocks',
        'autolink',
        'strikethrough',
        'superscript',
        'with_toc_data',
        'tables',
        'hardwrap'
    ]
Next Up...
The approach above works well if you only need one level of subnavigation. But what if you needed more? i.e. if you wanted all H3 tags "inside" of an H2 to create sub-subnavigation links in your menu?
We'll be covering that and more in a future blog post. So stay tuned!


